Cisco basic configuration/en
In this example we will configure a Cisco 2621XM Router
- hostname Viborg1
- fastethernet 0/0 - 192.168.22.1/24
- fastethernet 0/1 - 172.16.0.1/16
- loopback 0/0 - 10.10.10.1/32
- RIP version 2 on both subnets
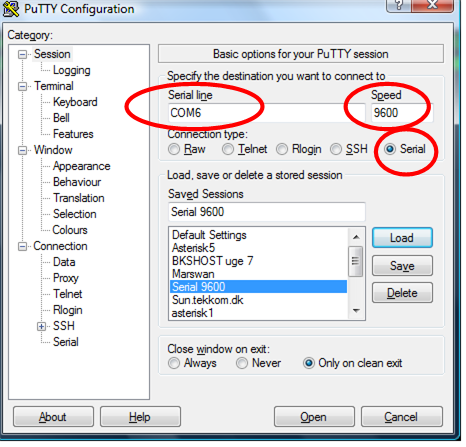
Connect a cisco Roolover cable from the Routers Consoleport to a COM port on your PC. Start a terminalemulator. I will recommend the terminalemulator putty
Start putty and fill out the serial data. Marked with red rings in picture 1. (My COM-port is on COM6, you need to find your own COM-port number)
Start the router and you can see on Putty that it is booting. When it has bootet you need to remove the existing configuration if it has one.
Contents
Checking for existing configuration
If the router after boot start the System Configuration Dialog as shown in the dialog below, the router has no startup-configuration and you can proceed to Setup step 1. If the router writes some weird messages, you need to erase the configuration.
         --- System Configuration Dialog ---

Would you like to enter the initial configuration dialog? [yes/no]: <input>yes</input>
Erasing existing configuration
To erase the existing configuration you need to login on the router as shown below. Note that we only use the passwords cisco or class. If your router has another password you need to perform the password recovery procedure.
R5>enable
Password:
R5#
After a successful login like shown above you need to erase the startup-config file in nvram: and reload the router. Show below.
R5#<input>erase startup-config</input>
Erasing the nvram filesystem will remove all configuration files! Continue? [confirm]
[OK]
Erase of nvram: complete
R5#<input>reload</input>
And the Router reloads with a empty configuration
setup step 1
See the example below
         --- System Configuration Dialog ---

Would you like to enter the initial configuration dialog? [yes/no]: <input>yes</input>

At any point you may enter a question mark '?' for help.
Use ctrl-c to abort configuration dialog at any prompt.
Default settings are in square brackets '[]'.

Basic management setup configures only enough connectivity
for management of the system, extended setup will ask you
to configure each interface on the system

Would you like to enter basic management setup? [yes/no]: <input>yes</input>
Configuring global parameters:

  Enter host name [Router]: <input>Viborg1</input>

  The enable secret is a password used to protect access to
  privileged EXEC and configuration modes. This password, after
  entered, becomes encrypted in the configuration.
  Enter enable secret: <input>cisco</input>

  The enable password is used when you do not specify an
  enable secret password, with some older software versions, and
  some boot images.
  Enter enable password: <input>class</input>

  The virtual terminal password is used to protect
  access to the router over a network interface.
  Enter virtual terminal password: <input>cisco</input>
  Configure SNMP Network Management? [yes]: <input>no</input>

Current interface summary


Any interface listed with OK? value "NO" does not have a valid configuration

Interface                  IP-Address      OK? Method Status                Protocol
FastEthernet0/0            unassigned      NO  unset  up                    down
FastEthernet0/1            unassigned      NO  unset  up                    down

Enter interface name used to connect to the
management network from the above interface summary: FastEthernet0/0

Configuring interface FastEthernet0/0:
  Use the 100 Base-TX (RJ-45) connector? [yes]:<input>yes</input>
  Operate in full-duplex mode? [no]: <input>yes</input>
  Configure IP on this interface? [yes]:<input>yes</input>
    IP address for this interface: <input>192.168.22.1</input>
    Subnet mask for this interface [255.255.255.0] :<input>255.255.255.0</input>
    Class C network is 192.168.22.0, 24 subnet bits; mask is /24

The following configuration command script was created:

hostname Viborg1
enable secret 5 $1$Q0eK$BS6PyvYOB0dfDILGrDYLc.
enable password class
line vty 0 4
password cisco
no snmp-server
!
no ip routing

!
interface FastEthernet0/0
no shutdown
media-type 100BaseX
full-duplex
ip address 192.168.22.1 255.255.255.0
no mop enabled
!
interface FastEthernet0/1
shutdown
no ip address
!
end


[0] Go to the IOS command prompt without saving this config.
[1] Return back to the setup without saving this config.
[2] Save this configuration to nvram and exit.

Enter your selection [2]:<input>2</input>
Setup step 2
FastEthernet 0/1
Now we need to configure fastethernet0/1
Viborg1><input>enable</input>
Viborg1#<input>configure terminal</input>
Enter configuration commands, one per line.  End with CNTL/Z.
Viborg1(config)#<input>interface FastEthernet0/1</input>
Viborg1(config-if)#<input>ip address 172.16.0.1 255.255.0.0</input>
Viborg1(config-if)#<input>no shutdown</input>
Viborg1(config-if)#<input>CTRL-Z</input>
Loopback 0
And the loopback0 interface
Viborg1#<input>configure terminal</input>
Viborg1(config)#<input>interface loopback 0</input>
Viborg1(config-if)#<input>ip address 10.10.10.1 255.255.255.255</input>
Viborg1(config-if)#<input>no shutdown</input>
Viborg1(config-if)#<input>CTRL-Z</input>
Enabling RIP
Now the rip routing protocol
Viborg1#<input>configure terminal</input>
Viborg1(config)#<input>ip routing</input>
Viborg1(config)#<input>router rip</input>
Viborg1(config-router)#<input>version 2</input>
Viborg1(config-router)#<input>network 192.168.22.0</input>
Viborg1(config-router)#<input>network 172.16.0.0</input>
Viborg1(config-router)#<input>network 10.0.0.0</input>
Viborg1(config-router)#<input>CTRL-Z</input>