Beaglebone Black/Flashing
From Teknologisk videncenter
Flash microSD kort
Ved opstart af BBB er det vigtigt at du
- Ikke placerer boardet på ledende materiale (Metal fx)
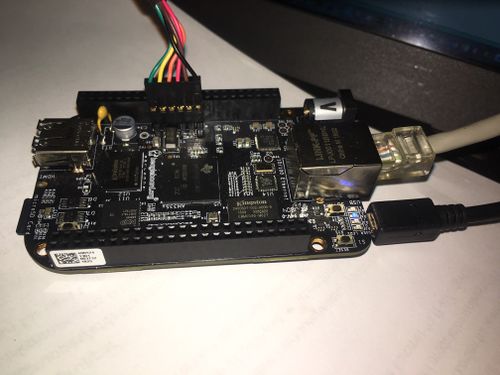
- Tilslutter det serielle kabel - (Sort ledning skal vende op imod ethernet stikket)
- Se billede herunder
- Åbner terminalemulator for eksempel putty eller mobaXterm
- Find COM port nummeret og sæt baudRate til 115200
- Boot fra den indbyggede flash. (microSD kort ikke indsat)
- Login
- sudo bash
- Indsæt microSD kort
- Check at filen /dev/mmcblk0 eksisterer (Undgå at lave en fil)
- sudo bash
- wget --no-check-certificate -qO- https://mars.merhot.dk/data/bbb/bone-debian-10.3-iot-armhf-2020-04-06-4gb.img.xz | xzcat | dd bs=10M of=/dev/mmcblk0 status=progress
- shutdown -r 0
- login
- df -h (Check at det er /dev/mmcblk0p1 der er under /)
- kør /opt/scripts/tools/grow_partition.sh
- shutdown -r 0
- check med df -h at ”/” har cirka 8 GB
- Install debian C linux development tools
Applying new 2023 image
- Remove micro-SD card
- Boot from old-image on on-board flash (mmcblk1)
- insert micro-SD card
- sudo bash
- new image: wget --no-check-certificate -qO- https://mars.merhot.dk/data/bbb/am335x-debian-12.2-iot-armhf-2023-10-07-4gb.img.xz | xzcat | dd bs=10M of=/dev/mmcblk0 status=progress
- shutdown -h 0
- Remove power from board
- Apply power and boot
- Login check with df -h that /dev/mmcblk0p1 is more than 7 GB - if not reboot and check again
- apt update and apt upgrade
- Install tmux, man-db
Flasher
Flasherimage can be used to install/upgrade eMMC flash on BBB boards
- Install Flasher Image on microSD card.
- Insert microSD card in BBB you wish to flash
- Press boot switch (Single switch in USB-A end)
- Apply power and hold switch down until LED's starts blinking
- When the four LED's starts blinking in sequence, flashing is in progress
- If one LED is on permanently there is an error, and you need the console to debug
- Wait until it shuts down
Adaption
- Missing config-pin get https://github.com/beagleboard/bb.org-overlays/blob/master/tools/beaglebone-universal-io/config-pin
- Missing X11 ssh forwarding
eth0 missing
See:
- https://wp.josh.com/2018/06/04/a-software-only-solution-to-the-vexing-beagle-bone-black-phy-issue/
- https://github.com/bigjosh/bbbphyfix
Missing UART4
When updating image to version 5.10.168-ti-r77 UART4 4 is not operational. Enable UART4 by inserting this line in /boot/uEnv.txt
uboot_overlay_addr0=BB-UART4-00A0.dtbo
P9_11 and P9_13 are removed from GPIO list - using config-pin, and placed in permanent UART4 mode.
- See overlays in /lib/linux-image-5.10.168-ti-r77/overlays/
