Difference between revisions of "CoE Cluster April 2012"
| Line 11: | Line 11: | ||
*[[/MD5 attack singlethreaded|MD5 attack singlethreaded]] | *[[/MD5 attack singlethreaded|MD5 attack singlethreaded]] | ||
*[[/Dell Cluster installation|Dell Cluster Installation]] | *[[/Dell Cluster installation|Dell Cluster Installation]] | ||
| + | *[[/MPI|Programmering med MPI]] | ||
=Programmering med MPI= | =Programmering med MPI= | ||
http://www.lam-mpi.org/tutorials/one-step/ezstart.php | http://www.lam-mpi.org/tutorials/one-step/ezstart.php | ||
Revision as of 10:05, 9 December 2011
{{#img: image=Super-computer-artw.jpg | page=Linux Cluster til Center of Excelence/Beskrivelse til CoE West | width=200px | title=Linux Supercomputer projekt }}
Contents
Equipment
MachoGPU
- IP Address:
- Local: 192.168.139.199
- Global: 83.90.239.182
- Login name: Your preferred.
- Password: l8heise
- Remember to change the password with the passwd command
Assignments
Programmering med MPI
http://www.lam-mpi.org/tutorials/one-step/ezstart.php
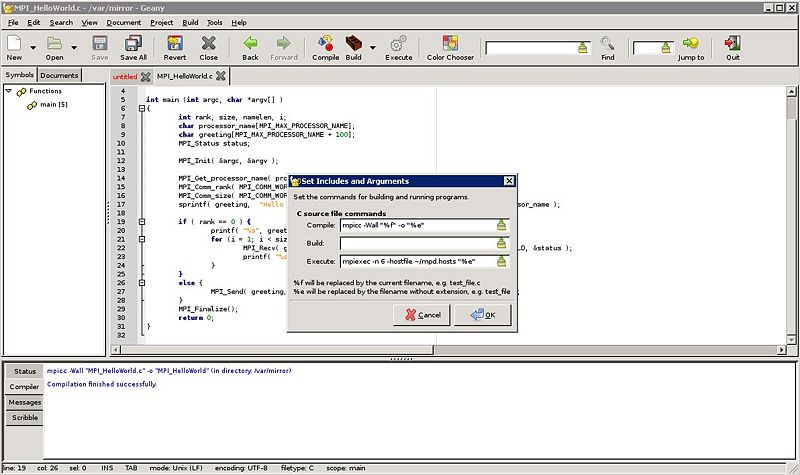
Geany IDE
Der findes et IDE man kan tilrette til cluster kompilering og eksekvering kaldet geany. Installation:
aptitude install geany
For at kompilere det med mpicc og eksekvere med mpiexec skal man lige rette lidt til under "Build > Set Includes and Arguments".
mpicc -Wall "%f" -o "%e"

mpiexec -n 20 -hostfile ~/mpd.hosts "%e"
Og til C++ bruger man mpic++ -Wall "%f" -o "%e"
Programmet man skriver skal selvfølgelig ligge i /var/mirror for de andre noder også har adgang til det.
Og den kan man selvfølgelig X'e over med
env DISPLAY=172.16.4.105:1 geany
Hello World eksempel
HelloWorld program
#include "mpi.h"
#include <stdio.h>

int main (int argc, char *argv[] )
{
        int rank, size, namelen;
        char processor_name[MPI_MAX_PROCESSOR_NAME];


        MPI_Init( &argc, &argv );

        MPI_Get_processor_name( processor_name, &namelen );
        MPI_Comm_rank( MPI_COMM_WORLD, &rank );
        MPI_Comm_size( MPI_COMM_WORLD, &size );
        printf( "Hello World from process %d, of %d on %s\n", rank, size, processor_name );
        MPI_Finalize();
        return 0;
}
Compile det med
mpicxx -o helloWorld helloWorld.c
og kør det med
mpiexec -n 10 /var/mirror/helloWorld
Resultatet skulle gerne blive
Hello World from process 2, of 10 on C05
Hello World from process 6, of 10 on C05
Hello World from process 3, of 10 on C06
Hello World from process 1, of 10 on C04
Hello World from process 5, of 10 on C04
Hello World from process 7, of 10 on C06
Hello World from process 9, of 10 on C04
Hello World from process 0, of 10 on C01
Hello World from process 4, of 10 on C01
Hello World from process 8, of 10 on C01
Hello World med MPI
Det forrige eksempel brugte ikke rigtig MPI til noget, ud over at få rank og size.
Hvis vi skal lave det om til at rank 0 er den der printer til skærmen og alle de andre sender via MPI til den, ville det se sådan ud:
#include "mpi.h"
#include <stdio.h>
#include <string.h>

int main (int argc, char *argv[] )
{
        int rank, size, namelen, i;
        char processor_name[MPI_MAX_PROCESSOR_NAME];
        char greeting[MPI_MAX_PROCESSOR_NAME + 100];
        MPI_Status status;

        MPI_Init( &argc, &argv );

        MPI_Get_processor_name( processor_name, &namelen );
        MPI_Comm_rank( MPI_COMM_WORLD, &rank );
        MPI_Comm_size( MPI_COMM_WORLD, &size );
        sprintf( greeting,  "Hello World from process %d, of %d on %s\n", rank, size, processor_name );

        if ( rank == 0 ) {
                printf( "%s", greeting );
                for (i = 1; i < size; i++ ) {
                        MPI_Recv( greeting, sizeof( greeting ), MPI_CHAR, i, 1, MPI_COMM_WORLD, &status );
                        printf( "%s", greeting );
                }
        }
        else {
                MPI_Send( greeting, strlen( greeting ) + 1, MPI_CHAR, 0, 1, MPI_COMM_WORLD );
        }
        MPI_Finalize();
        return 0;
}
Hvilket returnenrer:
0: Hello World from process 0, of 10 on C01
0: Hello World from process 1, of 10 on C04
0: Hello World from process 2, of 10 on C05
0: Hello World from process 3, of 10 on C06
0: Hello World from process 4, of 10 on C01
0: Hello World from process 5, of 10 on C04
0: Hello World from process 6, of 10 on C05
0: Hello World from process 7, of 10 on C06
0: Hello World from process 8, of 10 on C01
0: Hello World from process 9, of 10 on C04
Slides
Litteratur Liste
- MPI
- Introduction to Parallel Computing
- CUDA Overview from Nvidia
- Nvidia CUDA C Programming Guide
- OpenCV Tutorial
- OpenCV Reference
- Skin Detection algorithms for use in OpenCV/CUDA trials
Evaluering
Gå ind på Evaluering
og indtast koden til spørgeskemaet: JJ6Z-JQZJ-111K
