CoE Cluster november 2011/Dell Cluster installation
Contents
Hardware
Each group installs Ubuntu 10.10 32 bit on four Dell PowerEdge 1750 bladeserver with 36,5GB harddisk.
Rack
Position in Rack
- Common Switch for all groups
- Head node Group 1
- Node 1 Group 1
- Node 2 Group 1
- Node 3 Group 1
- Head node Group 2
- Node 1 Group 2
- Node 2 Group 2
- Node 3 Group 2
- Head node Group 3
- Node 1 Group 3
- Node 2 Group 3
- Node 3 Group 3
Switch configuration
- Group 1 VLAN 10 port 1 to 5
- Group 2 VLAN 20 port 6 to 10
- Group 3 VLAN 30 port 11 to 15
- Common VLAN 40 port 16 to 24 - Connected to 192.168.139.0/24 net
Filesystem
- / filesystem 2 GB primary
- /tmp filesystem 5 GB logical
- /var filesystem 5 GB primary
- /usr filesystem 6 GB logical
- swap filesystem 2 GB logical
- /home filesystem remaining space
Updating Ubuntu
Update
sudo bash
apt-get update
apt-get upgrade
List installed packages
Number of installed packages
root@newclusterh:~# <input>dpkg --get-selections | wc -l</input>
962
Searching installed packages
root@newclusterh:~#  <input>dpkg --get-selections | grep nfs</input>
libnfsidmap2                                    install
nfs-common                                      install
nfs-kernel-server                               install
root@newclusterh:~# <input>dpkg -L nfs-common</input>
/.
/etc
/etc/init.d
/etc/init
/etc/init/statd.conf
/etc/init/statd-mounting.conf
/etc/init/rpc_pipefs.conf
/etc/init/gssd.conf
<notice>...OUTPUT OMITTED...</notice>
Routing IPv4 and NAT-ing
Configuring additional NIC's
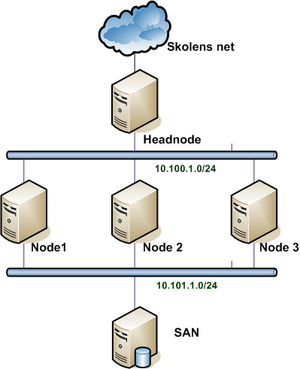
- Cluster networks between Headnode and Nodes.
- Group 1: 10.100.1.0/24
- Group 2: 10.100.2.0/24
- Group 3: 10.100.3.0/24
- Headnode public IP address
- Group 1: 192.168.139.21
- Group 2: 192.168.139.22
- Group 3: 192.168.139.23
- Switch: 192.168.139.24
- Cluster SAN networks between Nodes and SAN.
- Group 1: 10.101.1.0/24
- Group 2: 10.102.2.0/24
- Group 3: 10.103.3.0/24
edit the file /etc/network/interfaces. Example below
auto eth0
iface eth0 inet static
 address 192.168.139.50
 netmask 255.255.255.0
 gateway 192.168.139.1
 network 192.168.139.0
 broadcast 192.168.139.255

auto eth1
iface eth1 inet static
        address 10.0.0.1
        netmask 255.255.255.0
Head node
Routing IPv4
- Add or uncomment the line net.ipv4.ip_forward=1 in /etc/sysctl.conf to allow Routing after boot
- Issue the command sysctl -w net.ipv4.ip_forward=1 to allow routing in flight.
NAT with iptables
#!/bin/bash
#
# Start firewall
#
# Tillader ping indefra og ud.
# Lukker for al anden trafik.
# Diverse erklæringer
FW=iptables
INT_NET="10.0.0.0/24"
EXT_NET="172.16.4.0/24"
EXT_IP="172.16.4.99"
EXT_IF="eth0"

# Fjern alle tidligere regler
$FW -F INPUT
$FW -F OUTPUT
$FW -F FORWARD
$FW -F -t nat


# Sæt default politik til afvisning
$FW -P FORWARD ACCEPT

# Tillad ping indefra
$FW -A FORWARD -s $INT_NET -p icmp --icmp-type echo-request -j ACCEPT

# Tillad pong udefra
$FW -A FORWARD -d $INT_NET -p icmp --icmp-type echo-reply -j ACCEPT

# Source NAT på udgående pakker
$FW -t nat -A POSTROUTING -o $EXT_IF -s $INT_NET -j SNAT --to-source $EXT_IP
NFS server
install NFS package
root@headnode:~# <input>apt-get install nfs-kernel-server</input>Add export to /etc/export (Group 1 net shown)
/home 10.100.1.0/24(rw,sync,no_subtree_check,no_root_squash)Restart the NFS-Server
root@headnode:~# <input>/etc/init.d/nfs-kernel-server restart</input>Node clients
NFS client
Install NFS client package
root@node1:~# <input>apt-get install nfs-common</input>Mounting /home from headnode
First change the nodes own /home partition to /home2
mkdir /home2Change /etc/fstab to mount the local /home partition on the new /home2 directory. (See below)
UUID=d3bdcead-df52-d5ba7df3a1e4 /home2 ext4 defaults 0 2Add a line to /etc/fstab to mount the headnodes /home on the local nodes directory /home
10.100.3.1:/home /home nfs rw<notice>,vers=3</notice> 0 0/etc/hosts
Add machines to /etc/hosts for example
10.100.3.1      head3
10.100.3.31     node31
10.100.3.32     node32
10.100.3.33     node33
Auto login
To login from ssh without password between the machines in the cluster. Issue the following commands from the headnode.
su -c "ssh-keygen" <notice>USERNAME</notice>
cat /home/<notice>USERNAME</notice>/.ssh/id_rsa.pub > /home/<notice>USERNAME</notice>/.ssh/authorized_keys
chown <notice>USERNAME</notice>:<notice>USERNAME</notice> /home/<notice>USERNAME</notice>/.ssh/authorized_keys
Running processes on CPU's
Use mpstat -P ALL' to see current utilization of CPU's. See the CPU mask of any given process with taskset -p <PID>. With taskset it's possible to change the CPU mask of running processes and start commands on any given CPU or allow a range of CPU's the process can run on.
The Linux Scheduler decides which processes runs on which CPU's. See man sched_setscheduler.
SAN på Compute Nodes
Install a SAN in the backend of the compute nodes. For example FreeNAS
Networks
- Cluster networks between SAN and Nodes.
- Group 1: 10.101.1.0/24
- Group 2: 10.101.2.0/24
- Group 3: 10.101.3.0/24
- SAN switch 10.101.2.254 password cisco
SETI
Search for Extraterrestrial Intelligence (SETI)
apt-get install boinc-client
boinc  --attach_project http://setiathome.berkeley.edu 33161_02b5e31a4c4d32c2f158f08fa423601b
Der går ca. en halv times tid før software og de første data er downloadet.
iSCSI med Windows Server og Linux klient
Video der beskriver opsætning af et iSCSI target på en Windows 2008 R2 Server: http://technet.microsoft.com/en-us/edge/Video/ff710316
Følgende program skal bruges på Windows 2008 R2 Server: http://www.microsoft.com/download/en/details.aspx?id=19867
For at sætte en iSCSI initiater op på Ubuntu 10.10 kan følgende guide bruges:
http://www.howtoforge.com/using-iscsi-on-ubuntu-10.04-initiator-and-target
Når der skal sættes et SAN op kan det være en ide at bruge etherchannels for at opnå så høj båndbredde som mulig. Her er guides til hvordan dette sættes op i VMware og Ubuntu:
