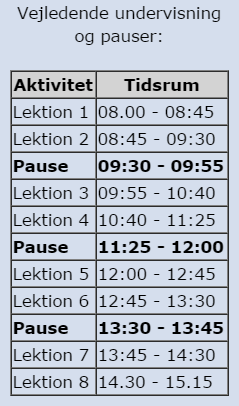
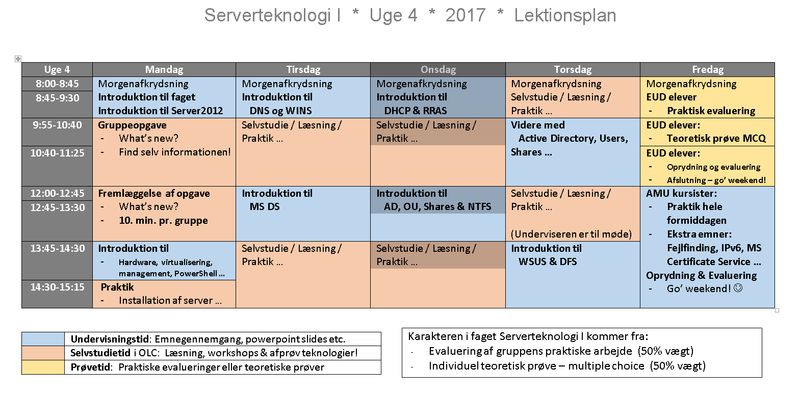
Difference between revisions of "6268 Virtualisering - Uge 1 2017"
(→Ugeoversigt:) |
(→Ugeoversigt:) |
||
| Line 103: | Line 103: | ||
- Access Your Student Desktop System | - Access Your Student Desktop System | ||
- Install vSphere Client | - Install vSphere Client | ||
| − | '''Lab 2:''' | + | '''Lab 2:''' Configuring ESXi Hosts |
| − | |||
• Examine the ESXi Host Hardware Configuration | • Examine the ESXi Host Hardware Configuration | ||
• Configure the DNS and Routing Information for an ESXi Host | • Configure the DNS and Routing Information for an ESXi Host | ||
• Configure an ESXi Host to Use Directory Services | • Configure an ESXi Host to Use Directory Services | ||
| − | + | '''Lab 3: Working with Virtual Machines''' | |
| − | • Create a Virtual Machine | + | • Create a Virtual Machine |
| − | • Install a Guest Operating System in a Virtual Machine | + | • Install a Guest Operating System in a Virtual Machine |
| − | • Identify the Virtual Machine's Disk Format and View Storage Metrics | + | • Identify the Virtual Machine's Disk Format and View Storage Metrics |
| − | • Install VMware Tools on a Virtual Machine Installed with a Windows OS | + | • Install VMware Tools on a Virtual Machine Installed with a Windows OS |
| − | Lab 4: Working with vCenter Server | + | '''Lab 4: Working with vCenter Server''' |
| − | • Access vCenter Server Appliance | + | • Access vCenter Server Appliance |
| − | • Install vCenter Server Appliance and Host License Keys | + | • Install vCenter Server Appliance and Host License Keys |
| − | • Create a Data Center Object | + | • Create a Data Center Object |
| − | • Add Your ESXi Host to the vCenter Server Inventory | + | • Add Your ESXi Host to the vCenter Server Inventory |
| − | • Configure Your ESXi Host as an NTP Client | + | • Configure Your ESXi Host as an NTP Client |
| − | Lab 5: Using vSphere Web Client | + | '''Lab 5: Using vSphere Web Client''' |
| − | • Navigate vSphere Web Client | + | • Navigate vSphere Web Client |
| − | • Pin and Unpin Panes | + | • Pin and Unpin Panes |
| − | • Hide the Getting Started Tabs | + | • Hide the Getting Started Tabs |
| − | • Upgrade the Virtual Machine's Hardware | + | • Upgrade the Virtual Machine's Hardware |
| − | Lab 6: Creating Folders in vCenter Server Appliance | + | '''Lab 6: Creating Folders in vCenter Server Appliance''' |
| − | • Create a Host and Cluster Folder | + | • Create a Host and Cluster Folder |
| − | • Create Virtual Machine and Template Folders | + | • Create Virtual Machine and Template Folders |
| − | Lab 7: Using Standard Switches | + | '''Lab 7: Using Standard Switches''' |
| − | • View the Standard Switch Configuration | + | • View the Standard Switch Configuration |
| − | • Create a Standard Switch with a Virtual Machine Port Group | + | • Create a Standard Switch with a Virtual Machine Port Group |
| − | • Attach Your Virtual Machine to the New Virtual Machine Port Group | + | • Attach Your Virtual Machine to the New Virtual Machine Port Group |
| − | Lab 8: Using vSphere Distributed Switches | + | '''Lab 8: Using vSphere Distributed Switches''' |
| − | • Create a Distributed Switch | + | • Create a Distributed Switch |
| − | • Add the ESXi Hosts to the New Distributed Switch | + | • Add the ESXi Hosts to the New Distributed Switch |
| − | • Examine Your Distributed Switch Configuration | + | • Examine Your Distributed Switch Configuration |
| − | • Migrate the Virtual Machines to a Distributed Switch Port Group | + | • Migrate the Virtual Machines to a Distributed Switch Port Group |
| − | Lab 9: Accessing iSCSI Storage | + | '''Lab 9: Accessing iSCSI Storage''' |
| − | • Add a VMkernel Port Group to a Standard Switch | + | • Add a VMkernel Port Group to a Standard Switch |
| − | • Configure the iSCSI Software Adapter and Connect It to the Storage | + | • Configure the iSCSI Software Adapter and Connect It to the Storage |
| − | Lab 10: Accessing NFS Storage | + | '''Lab 10: Accessing NFS Storage''' |
| − | • Configure Access to NFS Datastores | + | • Configure Access to NFS Datastores |
| − | • View NFS Storage Information | + | • View NFS Storage Information |
| − | Lab 11: Managing VMFS Datastores | + | '''Lab 11: Managing VMFS Datastores''' |
| − | • Change the Name of a VMFS Datastore | + | • Change the Name of a VMFS Datastore |
| − | • Create VMFS Datastores for the ESXi Host | + | • Create VMFS Datastores for the ESXi Host |
| − | • Expand a VMFS Datastore to Consume Unused Space on a LUN | + | • Expand a VMFS Datastore to Consume Unused Space on a LUN |
| − | • Remove a VMFS Datastore | + | • Remove a VMFS Datastore |
| − | • Extend a VMFS Datastore | + | • Extend a VMFS Datastore |
| − | Lab 12: Using Templates and Clones | + | '''Lab 12: Using Templates and Clones''' |
| − | • Create a Virtual Machine Template | + | • Create a Virtual Machine Template |
| − | • Create Customization Specifications | + | • Create Customization Specifications |
| − | • Deploy a Virtual Machine from a Template | + | • Deploy a Virtual Machine from a Template |
| − | • Clone a Powered-On Virtual Machine | + | • Clone a Powered-On Virtual Machine |
| − | Lab 13: Modifying Virtual Machines | + | '''Lab 13: Modifying Virtual Machines''' |
| − | • Increase the Size of a VMDK File | + | • Increase the Size of a VMDK File |
| − | • Adjust Memory Allocation on a Virtual Machine | + | • Adjust Memory Allocation on a Virtual Machine |
| − | • Rename a Virtual Machine in the vCenter Server Inventory | + | • Rename a Virtual Machine in the vCenter Server Inventory |
| − | • Add and Remove a Raw LUN on a Virtual Machine | + | • Add and Remove a Raw LUN on a Virtual Machine |
| − | • Expand a Thin-Provisioned Virtual Disk | + | • Expand a Thin-Provisioned Virtual Disk |
| − | Lab 14: Migrating Virtual Machines | + | '''Lab 14: Migrating Virtual Machines''' |
| − | • Migrate Virtual Machine Files from the Local Storage to the Shared Storage | + | • Migrate Virtual Machine Files from the Local Storage to the Shared Storage |
| − | • Create a Virtual Switch and a VMkernel Port Group for vSphere vMotion Migration | + | • Create a Virtual Switch and a VMkernel Port Group for vSphere vMotion Migration |
| − | • Perform a vSphere vMotion Migration of a Virtual Machine on a Shared Datastore | + | • Perform a vSphere vMotion Migration of a Virtual Machine on a Shared Datastore |
| − | • Perform a Cross-Host vSphere Storage vMotion Migration to a Local Datastore | + | • Perform a Cross-Host vSphere Storage vMotion Migration to a Local Datastore |
| − | Lab 15: Managing Virtual Machines | + | '''Lab 15: Managing Virtual Machines''' |
| − | • Unregister a Virtual Machine from the vCenter Server Appliance Inventory | + | • Unregister a Virtual Machine from the vCenter Server Appliance Inventory |
| − | • Register a Virtual Machine in the vCenter Server Appliance Inventory | + | • Register a Virtual Machine in the vCenter Server Appliance Inventory |
| − | • Unregister and Delete a Virtual Machine from the Disk | + | • Unregister and Delete a Virtual Machine from the Disk |
| − | • Take Snapshots of a Virtual Machine | + | • Take Snapshots of a Virtual Machine |
| − | • Revert to a Snapshot | + | • Revert to a Snapshot |
| − | • Delete an Individual Snapshot | + | • Delete an Individual Snapshot |
| − | • Use the Delete All Function in the Snapshot Manager | + | • Use the Delete All Function in the Snapshot Manager |
| − | Lab 16: Managing vApps | + | '''Lab 16: Managing vApps''' |
| − | • Create a vApp | + | • Create a vApp |
| − | • Power On a vApp | + | • Power On a vApp |
| − | • Remove a vApp | + | • Remove a vApp |
| − | Lab 17: Managing Resource Pools | + | '''Lab 17: Managing Resource Pools''' |
| − | • Create CPU Contention | + | • Create CPU Contention |
| − | • Create Resource Pools | + | • Create Resource Pools |
| − | • Verify Resource Pool Functionality | + | • Verify Resource Pool Functionality |
| − | Lab 18: Monitoring Virtual Machine Performance | + | '''Lab 18: Monitoring Virtual Machine Performance''' |
| − | • Create CPU Workload | + | • Create CPU Workload |
| − | • Use Performance Charts to Monitor CPU Utilization | + | • Use Performance Charts to Monitor CPU Utilization |
| − | • Undo Changes Made to the Virtual Machines | + | • Undo Changes Made to the Virtual Machines |
| − | Lab 19: Using Alarms | + | '''Lab 19: Using Alarms''' |
| − | • Create a Virtual Machine Alarm to Monitor a Condition | + | • Create a Virtual Machine Alarm to Monitor a Condition |
| − | • Create a Virtual Machine Alarm to Monitor an Event | + | • Create a Virtual Machine Alarm to Monitor an Event |
| − | • Trigger Virtual Machine Alarms and Acknowledge the Alarms | + | • Trigger Virtual Machine Alarms and Acknowledge the Alarms |
| − | • Disable Virtual Machine Alarms | + | • Disable Virtual Machine Alarms |
| − | Lab 20: Using vSphere HA | + | '''Lab 20: Using vSphere HA''' |
| − | • Create a Cluster Enabled for vSphere HA | + | • Create a Cluster Enabled for vSphere HA |
| − | • Add Your ESXi Host to a Cluster | + | • Add Your ESXi Host to a Cluster |
| − | • Test vSphere HA Functionality | + | • Test vSphere HA Functionality |
| − | • View the vSphere HA Cluster Resource Usage | + | • View the vSphere HA Cluster Resource Usage |
| − | • Manage vSphere HA Slot Size | + | • Manage vSphere HA Slot Size |
| − | • Configure a vSphere HA Cluster with Strict Admission Control | + | • Configure a vSphere HA Cluster with Strict Admission Control |
| − | Lab 21: Implementing a vSphere DRS Cluster | + | '''Lab 21: Implementing a vSphere DRS Cluster''' |
| − | • Create a Load Imbalance | + | • Create a Load Imbalance |
| − | • Create a vSphere DRS Cluster | + | • Create a vSphere DRS Cluster |
| − | • Verify Proper vSphere DRS Cluster Functionality | + | • Verify Proper vSphere DRS Cluster Functionality |
| − | • Create, Test, and Disable a VM-VM Affinity Rule | + | • Create, Test, and Disable a VM-VM Affinity Rule |
| − | • Create, Test, and Disable an Anti-Affinity Rule | + | • Create, Test, and Disable an Anti-Affinity Rule |
| − | • Create, Test, and Disable a VM-Host Affinity Rule | + | • Create, Test, and Disable a VM-Host Affinity Rule |
| − | Lab 22: Using vSphere Update Manager | + | '''Lab 22: Using vSphere Update Manager''' |
| − | • Install the vSphere Update Manager Server | + | • Install the vSphere Update Manager Server |
| − | • Install vSphere Update Manager | + | • Install vSphere Update Manager |
| − | • Modify the Cluster Settings | + | • Modify the Cluster Settings |
| − | • Configure vSphere Update Manager | + | • Configure vSphere Update Manager |
| − | • Create a Patch Baseline | + | • Create a Patch Baseline |
| − | • Attach a Baseline and Scan for Updates | + | • Attach a Baseline and Scan for Updates |
| − | • Stage the Patches onto the ESXi Hosts | + | • Stage the Patches onto the ESXi Hosts |
| − | • Remediate the ESXi Hosts | + | • Remediate the ESXi Hosts |
Revision as of 02:56, 31 December 2016
6268 Virtualisering
Contents
- 1 6268 Virtualisering
- 1.1 Generel information om kurset, de praktiske ting mm.
- 1.2 Arbejdsformer
- 1.3 Introduktion, agenda, indhold mm.
- 1.4 Virtualiseringsprogrammer - en oversigt
- 1.5 Bøger til kurset
- 1.6 Andre relevante links og tips til kurset
- 1.7 Ideer til ekstra øvelser og opgaver
- 1.8 Links samt tips og ideer til små testprogrammer til IT & netværk
- EUD - Valgfri specialefag - 6268 Virtualisering
Generel information om kurset, de praktiske ting mm.
- Faget køres næste gang på Mercantec i uge 1/2017
Undervisere
- Per Mariager
- Mail: pema@mercantec.dk
Praktisk info
- I tilfælde af brand - se skiltningen
- Rygning: Udenfor matriklen, nede ved gaden!
- Toilet: Forefindes i gangen
- Sygemelding:
- Elever på erhvervsuddannelserne (EUD-elever):
- Brug ELEVPLAN - log ind og benyt SMS systemet.
- Se vejledning her!
- AMU kursister bedes ringe til skolen eller sende en mail til underviseren
- Elever på erhvervsuddannelserne (EUD-elever):
- Afdelingens telefonnummer 89 50 33 00
Hvem deltager?
- Præsentation af underviseren
- Navn, baggrund og faglige interesser
- Præsentation af kursister
- Navn, firma, arbejdsopgaver i firmaet, forventninger til kurset ... :-)
Deltager forudsætninger
- For elever på erhvervskole på et hovedforløb forudsættes det:
- At man har gennemført Data Grundforløbet
- At man lige har haft faget Netværk I på Data H1
- At man lige har haft faget Servertek I - 6226 på Data H1
- At man lige har haft faget Linux på Data H1
- For AMU kursister forudsættes det at man har et mindre forhånds kendskab til både netværk, servere samt gerne linux
Formålet med faget
- Overblik over Virtualisering
- Du lærer at designe og installere en mindre virtuel løsning
- Du lærer begrebet Software-defined data center
- vCenter Server architecture
- VMware ESXi
- Design, installation og administration af ESXi i et mindre server miljø
- Configure virtual netværk med vSphere standard switches
- Oprette vApp
- Microsoft Windows clients - installation og administration
- VMware vCENTER
- Migrate virtuelle maskiner med VMware vSphere vMotion
- VMware vSphere Storage vMotion til at migrate virtual machine storage
- Manage VMware vSphere High Availability og VMware vSphere Fault Tolerance
- Udføre grundlæggende fejlsøgning på ESXi hosts, virtual maskiner, og vCenter Server operations
- ... og en del mere!
Udvalgt hardware, software, operativ systemer mm.
- VMware ESXi 6.5
- VMware vCENTER 6.5
- Microsoft Windows Server 2012R2
- Ubuntu Linux eller tilsvarende
Og så til sidst det vigtige: At have det sjovt samtidigt! :-)
Arbejdsformer
- Der skal arbejdes i grupper af to personer (til nød tre i en gruppe ... )
- Gruppedannelse: Grupperne dannes første dag, og i bestemmer selv grupperne.
- Hver gruppe råder over 2 stk nyere HP pc Det Virtuelle Miljø
- Undervejs opretter gruppen selv et antal virtuelle klienter og servere
- Hver enkelt kursist skal desuden bruge enten sin egen pc eller en HOT Data pc som management pc
- Der bliver en god blanding af undervisning og praktisk arbejde gennem hele ugen
Introduktion, agenda, indhold mm.
Bemærk: Programmet justeres løbende for at forbedre oplevelsen og udbyttet af kurset! Idéer modtages med tak :-)
Ugeoversigt:
Mandag:
 Tema: Introduktion, Test, Repetition & Virtualization - Lav jeres eget TestLab!
  - Introduktion og velkomst til virtualiserings kurset :-)
  - Software-Defined Data Center
    - Introduce Components of the Software-Defined Data Center
    - Where vSphere Fits into the Cloud Architecture
    - Install and Use vSphere Client
    - Overview of ESXi
  - Creating Virtual Machines
    - Introduce Virtual Machines, Virtual Machine Hardware, and Virtual Machine Files
    - Create and Work with Virtual Machines
- Byg jeres eget Virtuelle setup
  Lab 1:  Installing vSphere Client
    - Access Your Student Desktop System
    - Install vSphere Client
  Lab 2: Configuring ESXi Hosts
    • Examine the ESXi Host Hardware Configuration
    • Configure the DNS and Routing Information for an ESXi Host
    • Configure an ESXi Host to Use Directory Services
   Lab 3: Working with Virtual Machines
    • Create a Virtual Machine
    • Install a Guest Operating System in a Virtual Machine
    • Identify the Virtual Machine's Disk Format and View Storage Metrics
    • Install VMware Tools on a Virtual Machine Installed with a Windows OS
   Lab 4: Working with vCenter Server
    • Access vCenter Server Appliance
    • Install vCenter Server Appliance and Host License Keys
    • Create a Data Center Object
    • Add Your ESXi Host to the vCenter Server Inventory
    • Configure Your ESXi Host as an NTP Client
   Lab 5: Using vSphere Web Client
    • Navigate vSphere Web Client
    • Pin and Unpin Panes
    • Hide the Getting Started Tabs
    • Upgrade the Virtual Machine's Hardware
   Lab 6: Creating Folders in vCenter Server Appliance
    • Create a Host and Cluster Folder
    • Create Virtual Machine and Template Folders
   Lab 7: Using Standard Switches
    • View the Standard Switch Configuration
    • Create a Standard Switch with a Virtual Machine Port Group
    • Attach Your Virtual Machine to the New Virtual Machine Port Group
   Lab 8: Using vSphere Distributed Switches
    • Create a Distributed Switch
    • Add the ESXi Hosts to the New Distributed Switch
    • Examine Your Distributed Switch Configuration
    • Migrate the Virtual Machines to a Distributed Switch Port Group
   Lab 9: Accessing iSCSI Storage
    • Add a VMkernel Port Group to a Standard Switch
    • Configure the iSCSI Software Adapter and Connect It to the Storage
   Lab 10: Accessing NFS Storage
    • Configure Access to NFS Datastores
    • View NFS Storage Information
   Lab 11: Managing VMFS Datastores
    • Change the Name of a VMFS Datastore
    • Create VMFS Datastores for the ESXi Host
    • Expand a VMFS Datastore to Consume Unused Space on a LUN
    • Remove a VMFS Datastore
    • Extend a VMFS Datastore
   Lab 12: Using Templates and Clones
    • Create a Virtual Machine Template
    • Create Customization Specifications
    • Deploy a Virtual Machine from a Template
    • Clone a Powered-On Virtual Machine
   Lab 13: Modifying Virtual Machines
    • Increase the Size of a VMDK File
    • Adjust Memory Allocation on a Virtual Machine
    • Rename a Virtual Machine in the vCenter Server Inventory
    • Add and Remove a Raw LUN on a Virtual Machine
    • Expand a Thin-Provisioned Virtual Disk
   Lab 14: Migrating Virtual Machines
    • Migrate Virtual Machine Files from the Local Storage to the Shared Storage
    • Create a Virtual Switch and a VMkernel Port Group for vSphere vMotion Migration
    • Perform a vSphere vMotion Migration of a Virtual Machine on a Shared Datastore
    • Perform a Cross-Host vSphere Storage vMotion Migration to a Local Datastore
   Lab 15: Managing Virtual Machines
    • Unregister a Virtual Machine from the vCenter Server Appliance Inventory
    • Register a Virtual Machine in the vCenter Server Appliance Inventory
    • Unregister and Delete a Virtual Machine from the Disk
    • Take Snapshots of a Virtual Machine
    • Revert to a Snapshot
    • Delete an Individual Snapshot
    • Use the Delete All Function in the Snapshot Manager
   Lab 16: Managing vApps
    • Create a vApp
    • Power On a vApp
    • Remove a vApp
   Lab 17: Managing Resource Pools
    • Create CPU Contention
    • Create Resource Pools
    • Verify Resource Pool Functionality
   Lab 18: Monitoring Virtual Machine Performance
    • Create CPU Workload
    • Use Performance Charts to Monitor CPU Utilization
    • Undo Changes Made to the Virtual Machines
   Lab 19: Using Alarms
    • Create a Virtual Machine Alarm to Monitor a Condition
    • Create a Virtual Machine Alarm to Monitor an Event
    • Trigger Virtual Machine Alarms and Acknowledge the Alarms
    • Disable Virtual Machine Alarms
   Lab 20: Using vSphere HA
    • Create a Cluster Enabled for vSphere HA
    • Add Your ESXi Host to a Cluster
    • Test vSphere HA Functionality
    • View the vSphere HA Cluster Resource Usage
    • Manage vSphere HA Slot Size
    • Configure a vSphere HA Cluster with Strict Admission Control
   Lab 21: Implementing a vSphere DRS Cluster
    • Create a Load Imbalance
    • Create a vSphere DRS Cluster
    • Verify Proper vSphere DRS Cluster Functionality
    • Create, Test, and Disable a VM-VM Affinity Rule
    • Create, Test, and Disable an Anti-Affinity Rule
    • Create, Test, and Disable a VM-Host Affinity Rule
  Lab 22: Using vSphere Update Manager
    • Install the vSphere Update Manager Server
    • Install vSphere Update Manager
    • Modify the Cluster Settings
    • Configure vSphere Update Manager
    • Create a Patch Baseline
    • Attach a Baseline and Scan for Updates
    • Stage the Patches onto the ESXi Hosts
    • Remediate the ESXi Hosts
- I kommer til at arbejde meget med diverse GUI'er, med netværks kommandoer mm.,
      og sikkert også en del fejlfinding undervejs! :-)
   Selvstudie: 'Fase 1' læsning!
  - Se projektopgaven for yderligere info
    - MCSA 70-410 Cert Guide: Installing and Configuring Windows Server 2012 R2
      - Læs f.eks. kapitel 1, 2, 7 og 12
Tirsdag:
Tema: Klargøring af virtuelle maskiner, installation af Microsoft servere samt Active Directory, MS DS
  - Opsamling fra i går: Underviseren 'samler op' ... ! ;-)
    - Nogen spørgsmål?
  - Introduktion til DNS og WINS (PowerPoint)
  - Introduktion til Microsoft's Active Directory - Directory Services (PowerPoint)
Praktik: 'Installation' af et firma!
  - Arbejd videre med projektopgaven:
    - Hyper-V, management pc'er og masser af netværks infrastruktur!
      - Gør den fysiske infrastruktur færdig først!
      - Er der helt styr på forbindelserne mellem jeres fysiske netkort og de virtuelle switche???
    - Læg Windows ISO filer over i jeres nye Hyper-V miljø, så i er klar til at installere servere & klienter
      - Installation af de første virtuelle Server2012 R2'er, nemlig jeres RRAS og DC!
    - Hvor langt kan i nå i dag med projektopgaven?
   Selvstudie: 'Fase 2' læsning!
  - Se projektopgaven for yderligere info
    - MCSA 70-410 Cert Guide: Installing and Configuring Windows Server 2012 R2
      - Læs f.eks. kapitel 11 og 12
    - MCSA 70-412 Study guide - Windows Server 2012 R2 - Configuring Advanced Services
      - Læs f.eks. kapitel 4 om DHCP Split scope
    - Søg f.eks. på Microsoft TechNet efter Server2012 RRAS, NAT & Site-to-site VPN
Onsdag:
Tema: Opbygning og udbygning af firma-netværket, med bl.a. brugerkonti, DHCP-service og fil-service
  - Opsamling fra i går: Underviseren 'samler op' ... ! ;-)
    - Nogen spørgsmål?
  - Husk at kigge i bøgerne til kurset ;-)
  - Introduktion til RRAS rollen samt DHCP rollen (PowerPoint)
  - Introduktion til MS DS (AD) User accounts, Group policy osv.
Praktik: Videre med firma-netværket - og masser af services!
  - Arbejd videre med:
    - Site-to-site VPN, og tilpasninger mellem to gruppers netværk til ét domæne!
      - Meld gruppens DC02 ind i domænet og tilpas DNS redundans
      - Meld RRAS serveren ind i domænet
      - Grundkonfiguration af AD - hvordan var det nu!
        - Brugerkonti, Group policy etc. ...
    - Workstations installeres og der logges på domænet med en brugerkonto
    - DHCP service installeres og der laves redundans
    - Kan i nå mere? :-)
   Selvstudie: 'Fase 3' læsning!
  - Se projektopgaven for yderligere info
    - MCSA 70-410 Cert Guide: Installing and Configuring Windows Server 2012 R2
      - Læs f.eks. kapitel 3, 4, 14, 15 og 16
    - MCSA 70-411: Study guide: Administering Windows Server 2012 R2
      - Læs f.eks. kapitel 2
    - Søg f.eks. på Microsoft TechNet efter Server2012 WSUS
Torsdag:
Tema: De delte ressourcer på firmanetværket samt en masse sikkerheds-features
    - Introduktion til:
      - Fildeling på Microsoft systemer: NTFS permissions & file sharing
      - OU struktur samt 'best practice' indenfor tildeling af ressourcer til brugere i et firmanet
      - Print management og delte netværksprintere
      - WSUS rollen
      - Kan vi nå mere? ;-)
Praktik: Deling af ressourcer - og bedre sikkerhed på firmanettet!
  - Vigtigt: Sørg for at alle tidligere projektopgaver er lavet og at alt virker,
    før i går videre til torsdagens program ;-)
    - Følg med i underviserens gennemgang af deling af ressourcer på et firmanet - og prøv selv bagefter:
      - Lav en 'best practice' OU struktur i jeres firma
      - Konfigurér Access Management med NTFS efter 'best practice'
    - Følg med i underviserens netværksprinterinstallation, og prøv eventuelt selv bagefter,
      vi har en enkelt netværksprinter! :-)
    - Installér og konfigurér WSUS rollen på Server 2012 R2
      - 'Leg' med opdatering af en klient via WSUS!
    - Kan i nå mere?
Fredag:
Tema: Afsluttende prøve, Certifikater, IPsec, DFS & fejlfinding mm.
    - Erhvervsskoleelever:
      - Generel opsamling på mål, agenda og forløb!
        - Evaluering af gruppernes praktiske arbejde: Hvor meget har i nået at lave?
        - Afsluttende teoretisk prøve (Multiple Choice Test)
          - Klokken 10.00 er det prøvetid - log ind her!
          - Vejledning til MCQ testen
    - AMU kursister:
      - Introduktion til og projektarbejde med:
        - Fejlfinding på egne netværk
        - Certificate Services og PKI
        - Netværksprinter
        - DFS
        - Kan vi nå mere? ;-)
Praktik: Sikkerhed og distribueret filsystem!
  - Vigtigt: Sørg for at alle tidligere projektopgaver er lavet og at alt virker,
    før i går videre til fredagens program ;-)
  - Leg med:
    - at installere en Certifikat service - hvordan foregår det? Og hvordan virker den i praksis?
    - at installere en DFS service!
    - fejlfinding på jeres egne netværk!
    - Kan i nå mere?
Til sidst opsamling, evaluering og afslutning - og tak for denne gang! :-)
Opgavelisten - "Main tasks lists"
Bemærk:
- Her er et PDF-dokument med opgavelisten til kurset - klik her!
- Det er vigtigt at følge den nummer-rækkefølge som er på listen nedenunder!
- Gå ikke videre til næste punkt før det forrige virker ... ;-)
- Alle videoguides og vejledninger kan udleveres på USB hvis online versionen svigter.
- Tegningerne til grupperne kan hentes her:
  - Indledende opgaver:
    - Gruppen skal lave følgende:
      - Finde og placere en HP pc ved et bord ude i OLC'et (Navi II) - i "serverrummet",
        og finde skærm, mus og keyboard til den
      - Klargøre HP'en ved at installere Microsoft Server2012 R2 samt Hyper-V rollen
        - Bemærk: HP EliteDesk G2 SFF pc'erne kræver justering af BIOS samt driverinstallation - se her!
      - Først når i kan administrere jeres Hyper-V rolle via Hyper-V Management
        må i gå videre med projektopgaven! ;-)
  - Videoguides: (Er lavet i .mp4 format - download evt. hvis online afspilning fejler)
    - 1.1 Opret Hyper-V Virtual Switch'e til gruppens WAN, LAN og MAN netværk
      - Rettelse til guiden: Husk at oprette 3 stk. External switche knyttet til hver sit fysiske netkort,
        samt at bruge egne IP adresser!
      - Vigtigt: Gå ikke videre før I har styr på at det rigtige netkort et koblet til
        det rigtige fysiske netværk! ;-)
    - 1.2 Konfiguration af Hyper-V virtuelt hardware RRAS
    - 1.3 Installation af Server 2012 på virtuel Hyper-V host
    - 1.4 Grundlæggende konfiguration af Server 2012
    - 1.5 Konfiguration af Hyper-V virtuelt hardware DC01
    - 1.6 Installation af Active Directory på DC01
    - 1.7 RRAS01 DNS konfiguration og member server
    - 1.8 Installation og konfiguration af Routing and Remote Access (RRAS)
  - Vejledninger: (Download/visning af PDF dokument)
    - 2.1 Installing DHCP
    - 2.2 Configuring site-to-site VPN
    - 2.3 Configuring Active Directory Sites
    - 2.4 Installing additional DC and DNS
    - 2.5 Configuring DHCP 80_20 rule and DHCP relay agent
    - 2.6 Structuring and creating accounts in Active Directory
    - 2.7.1 Adding and initializing extra disk in Hyper-V
    - 2.7.2 Installing and configuring WSUS
    - 2.8 Configuring Access Management with NTFS and shares
    - 2.9 Installing and configuring Distributed File System
    - 3.0 Link to Microsoft Support side med Basic PKI installation
Virtualiseringsprogrammer - en oversigt
Her er en kort beskrivelse samt en installationsvejledning af følgende seks virtualiseringsprogrammer (lavet af elever på Serverteknologi I hold Oktober 2014):
- Microsoft Hyper-V Server 2012 R2 - Standalone server Introduktion Installation
- Microsoft Hyper-V Server 2012 R2 - Server2012 Role Introduktion Installation
- Microsoft Hyper-V Server 2012 R2 - Windows 8.x feature Installation
- Vmware Hypervisor ESXi version 5.5 - Standalone server Installation
- Vmware Workstation 10 - Client software Installation
- Oracle VirtualBox - Client software Introduktion Installation
Andre kilder til information omkring virtualisering:
- Wikipedia (Engelsk) om Hyper-V
- Microsoft Virtual Academy Hyper-V Jump Start kursus
- WiKi on VMware company
- Official VMware site (UK)
Bøger til kurset
SafariBooksOnline
- SafariBooks 10-days Free Trial
- MCSA 70-410 Cert Guide: Installing and Configuring Windows Server 2012 R2
- MCSA 70-411: Study guide: Administering Windows Server 2012 R2
- MCSA 70-412 Study guide - Windows Server 2012 R2 - Configuring Advanced Services
Indholdsfortegnelser over bøgerne til opslag under kurset
Index of MCSA 70-410 Cert Guide - Installing and Configuring Windows Server 2012 R2:
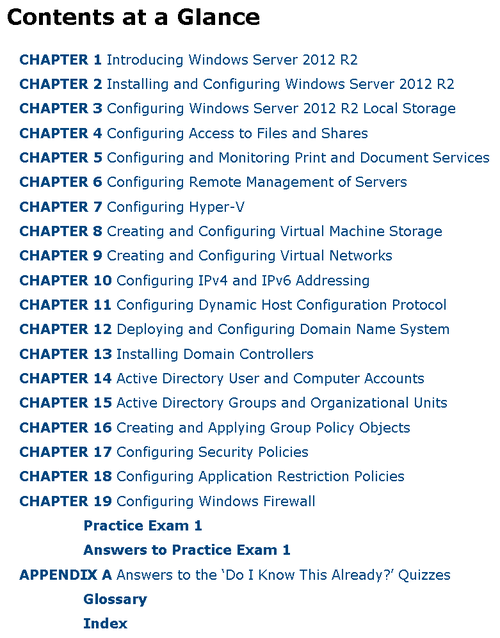
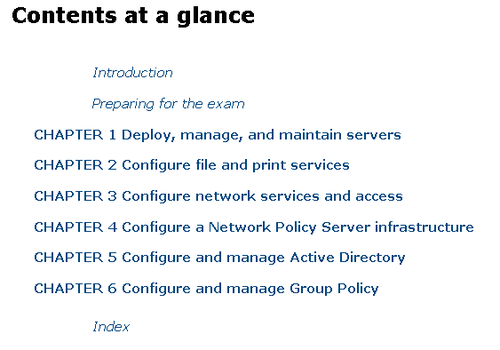
Index of MCSA 70-411: Administering Windows Server 2012 R2:
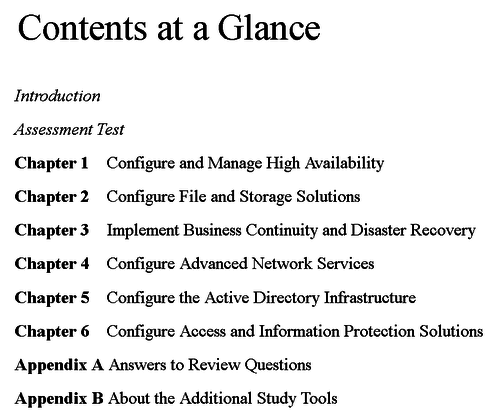
Index of MCSA 70-412 Study Guide - Windows Server 2012 R2 - Configuring Advanced Services:
Andre relevante links og tips til kurset
Microsoft Server2012 R2 links:
- Official Microsoft TecNet - on Server2012 R2
- Microsoft Server 2012 R2 cumulative updates (KB2919355)
- Microsoft Press - on Active Directory
- TechNet - on Active Directory database file Ntds.dit
- Shared folders best pratices - by Microsoft TechNet
- Group scope - Microsoft Server Security groups by TechNet
- Understanding DNS Dynamic Update - by Microsoft TechNet
- How interactive logon works - by Microsoft TechNet
Udvid Server 2012 R2 evaluation periode
Hvis Windows 2012 R2 evaluation licensen er udløbet lukker serveren ned cirka en gang i timen. For at undgå det:
- Start en kommandoprompt som administrator. (Højre klik på CMD ikonet og vælg Run as administrator
- Kør kommandoen slmgr.vbs -rearm
- Genstart serveren
Ideer til ekstra øvelser og opgaver
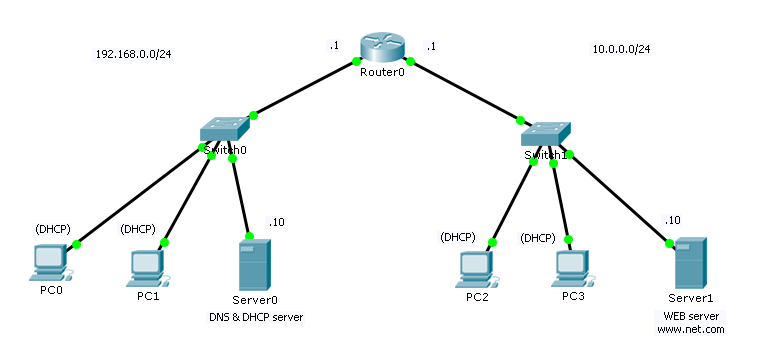
Repetitionsøvelse med Cisco Packet Tracer
- Introduktion til Cisco’s ‘Packet Tracer’:
- Packet Tracer er virtualiseringssoftware over Cisco’s enheder
- Konfiguration af Cisco netværksenheder - hvordan er det nu lige ...?
- Packet tracer software download
Byg herefter følgende netværk i packet tracer:
- Router: 1841
- Switch: 2960
Til sidst skal alle netværksenhederne kunne ping'e hinanden!
Fejlfinding
Introduktion til TCP/IP, netværk og server fejlfinding
- Troubleshooting - PowerPoint slide download
Packet Tracer fejlfindingsøvelser
- Error 1 - Jens claims he can not use Internet
- Error 2 - Ole claims he can not use local FTP
- Error 3 - Pia claims her pc does not work
- Error 4 - Otto claims the intranet.ttc.com page does not work
- Error 5 - Jesper claims he can reach nothing but local FTP
- Error 6 - Paul claims the public FTP suddenly stopped working
- Error 7 - Pia claims the Internet is very slow
- Error 8 - Ole claims the LAN is dead
- Error 9 - Jens claims he can not surf the Internet
Cisco Packet Tracer
- Cisco Packet Tracer øvelser: - Download øvelserne og åbn dem med Packet Tracer for at starte øvelsen.
- Opgave med pc - server - switch konfiguration
- Opgave med simpel routing konfiguration
- Guidet Cisco Packet tracer øvelse 1 - Installer og konfigurer to hosts
- Guidet Cisco Packet tracer activity 2 - Konfigurere hosts i routede netværk og leg for sjov
- Guidet Cisco Packet tracer activity 3 - Expanding an existing network infrastructure
Wireshark - et værktøj til at analysere datapakker på et netværk
- Introduktion til en ’Network Protocol Analyzer’
- ’Wireshark’ - programmet der kan analysere dataprotokoller: Introduktionsvideo til Wireshark
- Diverse øvelser med analyzeren: Hent og installer Wireshark, Kom godt i gang, Sæt et filter på, Gem en opsamling
- Wireshark
- Hjemmeside: http://www.wireshark.org
- Wiki: http://wiki.wireshark.org/
- Display filter: Reference
- Manual: User Guide
- Anvend Switch port mirroring for at sende trafikken til Wireshark
- Wireshark øvelser:
Links samt tips og ideer til små testprogrammer til IT & netværk
- Download putty
- Iperf og Jperf Belastningsprogrammer
- Solarwinds
- Toolset Mange små dejlige test programmer
- LANMsurveyer Dejligt program til at "finde" netværket.
- Hjemmeside: SolarWinds Mange små gode testprogrammer. (Flere gratis)
- Microsoft TechNet Windows 8.1 - Networking
- NMAP portscanner software til netværk
- NMAP er et kommandolinje baseret portscanner & analyse værktøj til netværk, som er specielt nyttigt i forbindelse med fejlfinding når der er services og firewalls involverede.
- Husk dog at du aldrig må bruge værktøjet på firmanetværk uden at have indhentet tilladelse først, da det kan have store konsekvenser hvis det enten bruges forkert eller belastningen er en nødvendighed for at opnå et bestemt måleresultat.
- Link: Den officielle NMAP.org side
- NMAP er et kommandolinje baseret portscanner & analyse værktøj til netværk, som er specielt nyttigt i forbindelse med fejlfinding når der er services og firewalls involverede.
