Difference between revisions of "FreePBX/en/Externsions/SIP extension"
From Teknologisk videncenter
< FreePBX | en | Externsions
m (Created page with "__NOTOC__ {| |- | =Install and configure SJphone SIP softphone= 150px|right Install [http://www.sjphone.org/sjp.html SJphone] Download [http://mars.tekkom....") |
m |
||
| (2 intermediate revisions by the same user not shown) | |||
| Line 1: | Line 1: | ||
__NOTOC__ | __NOTOC__ | ||
| + | =Adding a SIP account on FreePBX= | ||
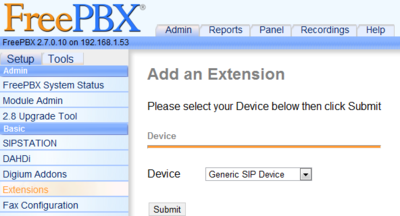
| + | Select extensions and add a '''Generic SIP phone'''. | ||
{| | {| | ||
|- | |- | ||
| | | | ||
| − | = | + | =Add Generic SIP phone= |
| − | [[Image: | + | ==Add Generic SIP phone on FreePBX== |
| − | + | #Login on your FreePBX in your browser as '''admin''' | |
| − | + | #Find and select '''Extensions''' in FreePBX's Menu | |
| − | + | [[Image:FreePBX Extensions 1.PNG|400px|left|thumb|'''1:''' Select Generic SIP Phone]] | |
| − | |||
| − | |||
| − | |||
| − | |||
| − | |||
|- | |- | ||
| | | | ||
---- | ---- | ||
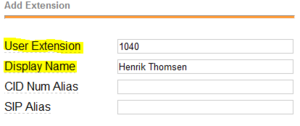
| − | + | Enter extension number and name | |
| − | + | [[Image:FreePBX Extensions 2.PNG|300px|left|thumb|'''2:''' Enter extension number and name]] | |
| − | |||
| − | [[Image: | ||
|- | |- | ||
| | | | ||
---- | ---- | ||
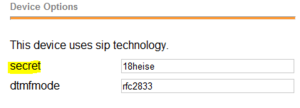
| − | + | Enter '''Secret''' | |
| − | [[Image: | + | [[Image:FreePBX Extensions 3.PNG|300px|left|thumb|'''3:''' Select a password for the phone]]<br/> |
|- | |- | ||
| | | | ||
---- | ---- | ||
| − | + | ||
| − | [[Image: | + | Press '''Submit''' for save the changes. |
| + | [[Image:FreePBX Extensions 3.1.PNG|200px|left|thumb|'''5:''' Saving the new configuration<br/> | ||
| + | ('''NOTE:''' Configuration not activatet yet!!)]] | ||
| + | |||
|- | |- | ||
| | | | ||
---- | ---- | ||
| − | + | Activate configuration by selecting '''Apply Configuration Changes''' | |
| − | [[Image: | + | [[Image:FreePBX Extensions 3.2.PNG|400px|left|thumb|'''6:''' Activate changes]] |
| + | |||
|- | |- | ||
| | | | ||
---- | ---- | ||
| − | + | Select '''continue reload''' | |
| + | [[Image:FreePBX Extensions 3.3.PNG|400px|left|thumb|'''7:''' '''continue reload''']] | ||
| − | |||
|- | |- | ||
|} | |} | ||
| + | <!-- | ||
| + | ==Oprettelse af Cisco 7940/60 konfigurationsfil== | ||
| + | Der skal logges ind på FreePBX serveren med ssh (Login: root password: l8heise) | ||
| + | [[Image:FreePBX_cisco_1.png|thumb|300px|left|Start programmet]] | ||
| + | [[Image:FreePBX_cisco_2.png|thumb|500px|left|Vælg opret ny telefon]] | ||
| + | [[Image:FreePBX_cisco_3.png|thumb|500px|left|Udfyld formularen og opret telefonen]] | ||
| + | --> | ||
[[Category:FreePBX]] | [[Category:FreePBX]] | ||
Latest revision as of 06:13, 8 May 2013
Adding a SIP account on FreePBX
Select extensions and add a Generic SIP phone.
Add Generic SIP phoneAdd Generic SIP phone on FreePBX
|
|
Enter extension number and name |
|
Enter Secret |
|
Press Submit for save the changes. |
|
Activate configuration by selecting Apply Configuration Changes |
|
Select continue reload |


