Difference between revisions of "VMware ESXI notater"
From Teknologisk videncenter
m (→SSH access til ESXI boks) |
m (→SSH access til ESXI boks) |
||
| Line 11: | Line 11: | ||
== Kommandoer i shell == | == Kommandoer i shell == | ||
* Se netværksconfig: ''esxcfg-nics -l'' og ''esxcfg-vmknic -l'' og '' esxcfg-info -n | more'' | * Se netværksconfig: ''esxcfg-nics -l'' og ''esxcfg-vmknic -l'' og '' esxcfg-info -n | more'' | ||
| + | * Add static route ''esxcfg-route -a 192.168.22.0/24 172.16.4.16'' | ||
= VMware Infrastructure Management Assistant (VIMA) = | = VMware Infrastructure Management Assistant (VIMA) = | ||
Revision as of 09:27, 28 February 2010
Contents
SSH access til ESXI boks
- BEMÆRK:SSH access til ESXI er ikke supporteret af VMWARE
- <CRTL>-<ALT>-<F1> på konsol
- skriv unsupported (Echoes ikke tilbage)
- Tast root password
- vi /etc/inetd.conf
- fjern # fra ssh linien
- exit
- <CRTL>-<ALT>-<F2> på konsol
- restart
Kommandoer i shell
- Se netværksconfig: esxcfg-nics -l og esxcfg-vmknic -l og esxcfg-info -n | more
- Add static route esxcfg-route -a 192.168.22.0/24 172.16.4.16
VMware Infrastructure Management Assistant (VIMA)
Pak ud i folder og Deploy OVF template fra VMware Client. Installerer Redhat Linux VM. Start og giv passwd til bruger vi-admin. Giv evt. root et passwd med sudo passwd root og ændre root i /etc/passwd med vipw fra nologin til /bin/bash.
VIMA kommandoer
[root@vm ~]# <input>vmware-cmd.pl -U root -P SECRET_PW -H 192.168.1.101  -l</input>

/vmfs/volumes/4b379b49-1ce09faa-230a-002186f400f1/CentOS54-1/CentOS54-1.vmx
/vmfs/volumes/4b379b49-1ce09faa-230a-002186f400f1/XP/XP.vmx
/vmfs/volumes/4b379b49-1ce09faa-230a-002186f400f1/FreeBSD/FreeBSD.vmx
/vmfs/volumes/4b379b49-1ce09faa-230a-002186f400f1/Solaris/Solaris.vmx
/vmfs/volumes/4b379b49-1ce09faa-230a-002186f400f1/Ubuntu desktop 9.04/Ubuntu desktop 9.04.vmx
/vmfs/volumes/4b379b49-1ce09faa-230a-002186f400f1/Ubuntu server 9.10 64bit/Ubuntu server 9.10 64bit.vmx
/vmfs/volumes/4b379b49-1ce09faa-230a-002186f400f1/VMware Infrastructure Management/VMware Infrastructure Management.vmx
[root@vm ~]# <input>vmware-cmd.pl -U root -P SECRET_PW -H 192.168.1.101 /vmfs/volumes/4b379b49-1ce09faa-230a-002186f400f1/FreeBSD/FreeBSD.vmx getuptime</input>
getuptime() = 20055
[root@vm ~]#
Tilføj brugere
[root@vm ~]# <input>esxcfg-user -g students -r admin -l ka -n "Karl Andersen" -s no -p KARLS_PW  -e user -o add --server  192.168.1.101 --servicepath /sdk/webService --password ROOTS_PW --username root</input>
Created user ka Successfully
Assigned to the group students
Assigned the role admin
virtual switch
[root@vm ~]# <input>esxcfg-vswitch   -l --server  192.168.1.101 --servicepath /sdk/webService --password De4siccna. --username root</input>
Switch Name     Num Ports       Used Ports      MTU     Uplinks
vSwitch0        64              10              1500    vmnic0

  PortGroup Name        VLAN ID   Used Ports      Uplinks
  VM Network            0         7               vmnic0
  Management Network    0         1               vmnic0
VMware in VMware
Kører fint
VMware vCenter Converter
vCenter Converter kan installeres:
- lokalt
- som server
- som klient
- som agent
Konverterer fra
VMware vCenter Converter can import virtual machines created in:
- VMware Workstation
- VMware Player
- VMware Fusion
- VMware ESX/ESXi
- VMware Server
- VMware vCenter Server
- Microsoft Virtual PC
- Microsoft Virtual Server
- Microsoft Hyper-V. Microsoft Hyper-V VM imports are supported as a physical source.
Opdatering
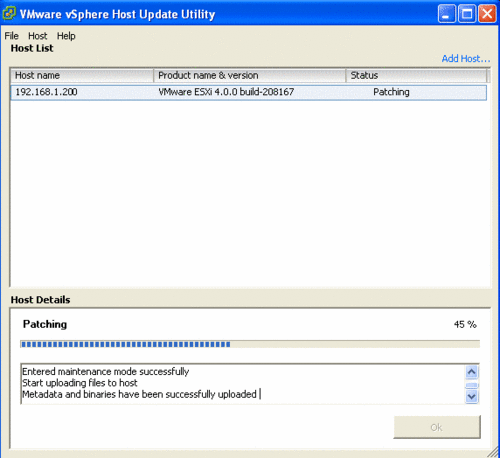
vSphere host Update Utility
Ved installation af VMware vSphere Client sættes fluehak i installer WMware vSphere host Update Utility
Manual Patching
Automatisering
PowerCLI
- Windows PowerShell skal være installeret PowerShell
- PowerCLI fra VMware
