Difference between revisions of "Cisco basic configuration"
From Teknologisk videncenter
m |
m |
||
| Line 1: | Line 1: | ||
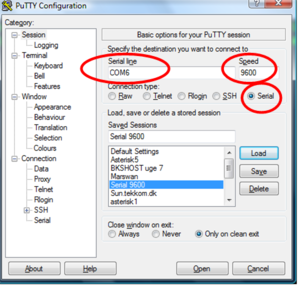
[[Image:Puttyserial.png|right|300px|thumb|Picture 1: Putty serial communication]] | [[Image:Puttyserial.png|right|300px|thumb|Picture 1: Putty serial communication]] | ||
In this example we will configure a Cisco 2621XM Router | In this example we will configure a Cisco 2621XM Router | ||
| + | *hostname Viborg1 | ||
*fastethernet 0/0 - 192.168.22.1/24 | *fastethernet 0/0 - 192.168.22.1/24 | ||
*fastethernet 0/1 - 172.16.0.1/16 | *fastethernet 0/1 - 172.16.0.1/16 | ||
Revision as of 08:59, 8 April 2009
In this example we will configure a Cisco 2621XM Router
- hostname Viborg1
- fastethernet 0/0 - 192.168.22.1/24
- fastethernet 0/1 - 172.16.0.1/16
- loopback 0/0 - 10.10.10.1/32
- RIP version 2 on both subnets
Connect a cisco Roolover cable from the Routers Consoleport to a COM port on your PC. Start a terminalemulator. I will recommend the terminalemulator putty Start putty and fill out the serial data. Marked with red rings in picture 1.
- BREAK
- password cisco class
- enable
- erase sta
- reload
