Difference between revisions of "Cisco basic configuration"
m (→Starte og konfigurere RIP) |
m (→Gem konfigurationen) |
||
| Line 188: | Line 188: | ||
Sidst men ikke mindst er det vigtigt at gemme konfigurationen i ''NVRAM''. | Sidst men ikke mindst er det vigtigt at gemme konfigurationen i ''NVRAM''. | ||
<source lang="cli"> | <source lang="cli"> | ||
| − | Viborg1#<input> | + | Viborg1#<input>copy running-config startup-config</input> |
Destination filename [startup-config]?<input><ENTER></input> | Destination filename [startup-config]?<input><ENTER></input> | ||
Building configuration... | Building configuration... | ||
Revision as of 07:53, 31 May 2009
Contents
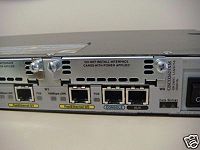
Grundkonfiguration af Cisco routerI dette eksempel konfigureres en Cisco 2621XM router fra grunden. KonfigurationsoversigtEn Cisco 2621XM har to FastEthernet interfaces. FastEthernet 0/0 og FastEthernet 0/1.
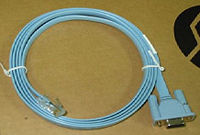
Forbind routerens port markeret med blåt console og en PC's COM port med et cisco roolover kabel.
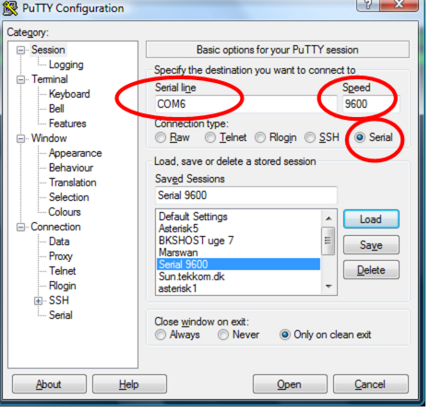
Start en terminalemulator på PC'en. Jeg vil anbefale terminalemulatoren putty Start Putty and udfyld konfigurationsbilledet som markeret med de røde ringe i billede 3. (Min COM port er på COM6. Din er måske på en anden. Forsøg dig frem eller se det i Windows enhedshåndtering) Start routeren og du bør kunne se på Putty at routeren er ved at boote. Når routeren er bootet er det måske nødvendigt at fjerne en eventuel eksisterende konfiguration. Følg anvisningerne herunder. |
| ||||
Undersøg om der er en eksisterende konfiguration
Hvis routeren efter den har bootet viser System Configuration Dialog som vist i dialogbilledet nedenunder, har routeren ingen konfiguration liggende og du kan fortsætte til Konfiguration trin 1. Hvis routeren skriver en række fejlbeskeder på skærmen er det nødvendigt at Slette den eksisterende konfiguration
         --- System Configuration Dialog ---

Would you like to enter the initial configuration dialog? [yes/no]:
Slet eksisterende konfiguration
For at slette den eksiterende konfiguration skal man først logge ind på routeren. Vi bruger altid passwordet cisco, class eller Cisco her på skolen. Du bør således kunne logge ind som vist herunder. Hvis du mod forventning ikke kan logge ind er det nødvendigt at udføre proceduren password recovery procedure.
R5><input>enable</input>
Password:
R5#
Efter du er logget ind på routeren kan du slette konfigurationen som ligger i en fil som hedder startup-config og genstarte routeren. erase startup-config slettet konfigurationen og reload genstarter routeren. Vist herunder.
R5#<input>erase startup-config</input>
Erasing the nvram filesystem will remove all configuration files! Continue?<input><ENTER></input>
[OK]
Erase of nvram: complete
R5#<input>reload</input>
Routeren booter nu uden konfiguration, og er parat til at blive konfigureret.
Konfiguration trin 1
I eksemplet nedenunder er det vist med hvid hvad der skal tastes. det med grøn tekst er det som routeren skriver i vinduet.
         --- System Configuration Dialog ---

Would you like to enter the initial configuration dialog? [yes/no]: <input>yes</input>

At any point you may enter a question mark '?' for help.
Use ctrl-c to abort configuration dialog at any prompt.
Default settings are in square brackets '[]'.

Basic management setup configures only enough connectivity
for management of the system, extended setup will ask you
to configure each interface on the system

Would you like to enter basic management setup? [yes/no]: <input>yes</input>
Configuring global parameters:

  Enter host name [Router]: <input>Viborg1</input>

  The enable secret is a password used to protect access to
  privileged EXEC and configuration modes. This password, after
  entered, becomes encrypted in the configuration.
  Enter enable secret: <input>cisco</input>

  The enable password is used when you do not specify an
  enable secret password, with some older software versions, and
  some boot images.
  Enter enable password: <input>class</input>

  The virtual terminal password is used to protect
  access to the router over a network interface.
  Enter virtual terminal password: <input>cisco</input>
  Configure SNMP Network Management? [yes]: <input>no</input>

Current interface summary


Any interface listed with OK? value "NO" does not have a valid configuration

Interface                  IP-Address      OK? Method Status        Protocol
FastEthernet0/0            unassigned      NO  unset  up            down
FastEthernet0/1            unassigned      NO  unset  up            down

Enter interface name used to connect to the
management network from the above interface summary: <input>FastEthernet0/0</input>

Configuring interface FastEthernet0/0:
  Use the 100 Base-TX (RJ-45) connector? [yes]:<input>yes</input>
  Operate in full-duplex mode? [no]: <input>yes</input>
  Configure IP on this interface? [yes]: <input>yes</input>
    IP address for this interface: <input>192.168.22.1</input>
    Subnet mask for this interface [255.255.255.0] : <input>255.255.255.0</input>
    Class C network is 192.168.22.0, 24 subnet bits; mask is /24

The following configuration command script was created:

hostname Viborg1
enable secret 5 $1$Q0eK$BS6PyvYOB0dfDILGrDYLc.
enable password class
line vty 0 4
password cisco
no snmp-server
!
no ip routing

!
interface FastEthernet0/0
no shutdown
media-type 100BaseX
full-duplex
ip address 192.168.22.1 255.255.255.0
no mop enabled
!
interface FastEthernet0/1
shutdown
no ip address
!
end


[0] Go to the IOS command prompt without saving this config.
[1] Return back to the setup without saving this config.
[2] Save this configuration to nvram and exit.

Enter your selection [2]:<input>2</input>
Konfiguration trin 2
FastEthernet 0/1
Konfiguration af fastethernet0/1 interfacet.
Viborg1#<input>configure terminal</input>
Enter configuration commands, one per line.  End with CNTL/Z.
Viborg1(config)#<input>interface FastEthernet0/1</input>
Viborg1(config-if)#<input>ip address 172.16.0.1 255.255.0.0</input>
Viborg1(config-if)#<input>no shutdown</input>
Viborg1(config-if)#<input><CTRL-Z></input>
Loopback 0
Konfiguration af loopback0 interfacet.
Viborg1#<input>configure terminal</input>
Viborg1(config)#<input>interface loopback 0</input>
Viborg1(config-if)#<input>ip address 10.10.10.1 255.255.255.255</input>
Viborg1(config-if)#<input>no shutdown</input>
Viborg1(config-if)#<input><CTRL-Z></input>
Starte og konfigurere RIP
Viborg1#<input>configure terminal</input>
Viborg1(config)#<input>ip routing</input>
Viborg1(config)#<input>router rip</input>
Viborg1(config-router)#<input>version 2</input>
Viborg1(config-router)#<input>network 192.168.22.0</input>
Viborg1(config-router)#<input>network 172.16.0.0</input>
Viborg1(config-router)#<input>network 10.0.0.0</input>
Viborg1(config-router)#<input><CTRL-Z></input>
Gem konfigurationen
Sidst men ikke mindst er det vigtigt at gemme konfigurationen i NVRAM.
Viborg1#<input>copy running-config startup-config</input>
Destination filename [startup-config]?<input><ENTER></input>
Building configuration...
[OK]
Ekstra konfiguration
Lang ventetid ved stavefejl
Slå DNS opslag fra, hvis du har problemer med stavefejl i kommandoer og det tager lang tid før du igen kan taste kommanoder.
Viborg1#<input>configure terminal</input>
Viborg1(config)#<input>no ip domain-lookup</input>
</source>


