Netband
The main goal of this project is to design, implement and test some of the many security functionalities in Cisco IOS.
Course description
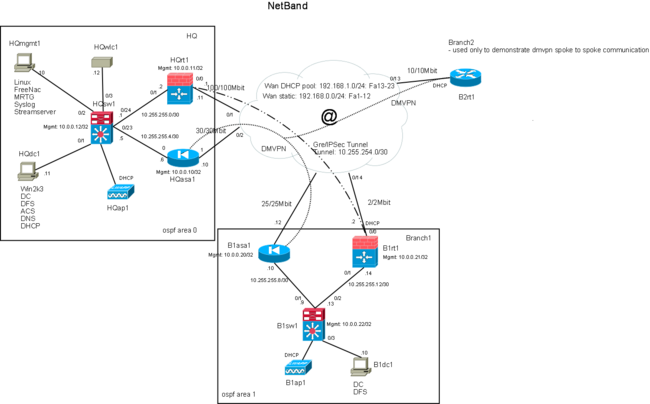
A small company setup is used to illustrate and document the various relevant security features on an network infrastructure. The bussiness case evolves around a small to medium sized company with a centralized HQ and a number of remote branch offices. The project will consist mainly of cisco switches, routers and Asa firewall appliances. In order to support and demonstrate selected features, a small number of linux and windows servers are installed. The servers are just used as support so only basic configuration and security are implemented.
The project will touch on the following areas:
- DMVPN
- WLC
- IPSec vpn
- Asa firewall
- Zone based firewall
- IOS firewall
- IOS ips
- DHCP snooping
- Dynamic Arp Inspection
- IP Source Guard
- SNMPv3
- Embedded event manager
- 802.1x
- VMPS
- CoPP
- Private vlans
- Multicast
- Device hardening
- Syslog
- DHCP
- DFS
- AD
- Goodies
- Network access control
Ip addresses
HQ
| Vlan name | Ip address range | Vlan number |
| ServerHQ | 10.1.1.0/24 | 3 |
| GuestHQ | 172.16.0.0/24 | 4 |
| ClientHQ | 10.1.2.0/24 | 5 |
| PhoneHQ | 10.1.3.0/24 | 6 |
Branch1
| Vlan name | Ip address range | Vlan number |
| ServerB1 | 10.2.1.0/24 | 3 |
| GuestB1 | 172.16.1.0/24 | 4 |
| ClientB1 | 10.2.2.0/24 | 5 |
| PhoneB1 | 10.2.3.0/24 | 6 |
Misc.
| Purpose | Ip address range |
| Lan p2p links | 10.255.255.x/30 |
| Management | 10.0.0.x/32 |
| Gre p2p links | 10.255.254.x/30 |
/*see the network diagram for the ip address assignments
Equipment list
HQ
1 x Asa5505
1 x Wlc2006
1 x Catalyst 3560 PoE (default IOS:(C3560-IPSERVICES-M), Version 12.2(25)SEE3, RAM 128MB, Flash: 16MB)
1 x 1221 Lap
1 x 2801 (IOS Software, 2801 Software (C2801-ADVIPSERVICESK9-M), Version 12.4(9)T, RAM: 128MB, Flash: 64MB)
Branch 1
1 x Asa5505
1 x Catalyst 3560 PoE (default IOS:(C3560-IPSERVICES-M), Version 12.2(25)SEE3, RAM 128MB, Flash: 16MB)
1 x 1221 Lap
1 x 2801 (IOS Software, 2801 Software (C2801-ADVIPSERVICESK9-M), Version 12.4(9)T, RAM: 128MB, Flash: 64MB)
Cloud
1 x 2801 ((C2801-ADVIPSERVICESK9-M), Version 12.4(9)T, RAM: 128MB, Flash: 64MB)
1 x 3560 ((C3560-IPSERVICES-M), Version 12.2(25)SEB4, RAM:128MB, Flash: 32MB)
Reference links
Include this in all documents
This page is part of the [[Netband_Project|Netband Project]]
Passwords
Internet NAT router(192.168.138.148): cisco
Internet Switch(192.168.0.5): cisco
Ubuntu server (10.1.1.10): administrator or root:ciscodisco
W2k3 Server HQ (10.1.1.11): Administrator:ciscodisco
AD client users:
user1:user1pw
AD domain amdin users: adadm:ciscodisco
External Links
802.1x
This page is part of the Netband Project
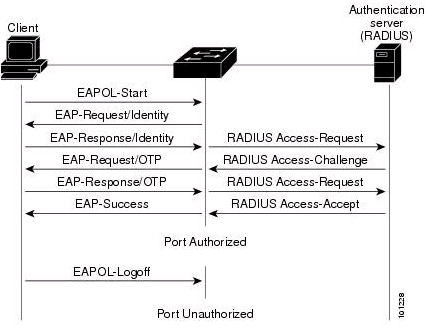
- provides accesscontrol at the switchport
- Consists of
- Auhtenticator
- The device that handles the authentication on behalf of the clients
- Supplicant(client)
- The clients conencting to the network
- Authentication server
- Radius server
- Auhtenticator
Configuration
- Allows only one host on a switchport
- The host must be authenticated before normal traffic will be allowed through the switchport
- The host must be 802.1x compatible
<pre"> aaa new-model ! dot1x system-auth-control ! aaa authentication dot1x default group Hq_radius_server ! aaa group server radius Hq_radius_server
server 10.1.1.11 auth-port 1645 acct-port 1646
! radius-server key ciscodisco </pre>
- 12.2(46)SE and earlier
interface FastEthernet0/10
  dot1x port-control auto
  dot1x host-mode single-host
  dot1x violation-mode protect
- 12.2(50)SE or later
interface FastEthernet0/10
 authentication port-control auto
 authentication host-mode single-host
 authentication violation protect
External Links
802.1x 12.2(46)SE
802.1x 12.2(50)SE
http://wiki.freeradius.org/FreeRADIUS_Active_Directory_Integration_HOWTO#Configuration_of_eap.conf
CoPP
This page is part of the Netband Project
Control Plane Policing
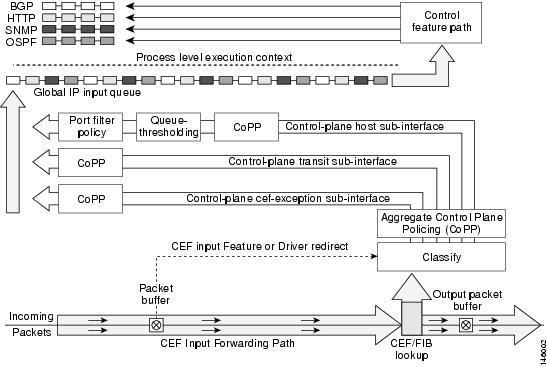
- The Control Plane Policing feature allows users to configure a quality of service (QoS) filter that manages the traffic flow of control plane packets to protect the control plane of Cisco IOS routers and switches against reconnaissance and denial-of-service (DoS) attacks.
- CoPP can help maintain packet forwarding and protocol states despite an attack or heavy traffic load on the router or switch.
- Uses MQC (Modular QoS CLI)
- In version 12.4(4)T additional features were introduced
- Control plane protection
- Port-filtering
- Queue-thresholding
Control Plane Protection
- Introduces subinterfaces to the control plane
- Aggregrate Control Plane Policing
- Control Plane cef-exception subinterface
- receives all traffic that is either redirected as a result of a configured input feature in the CEF packet forwarding path for process switching or directly enqueued in the control plane input queue by the interface driver.
- Eg. ARP, L2 Keepalives and all non-IP host traffic.
- Control Plane host subinterface
- receives all control-plane IP traffic that is directly destined for one of the router interfaces.
- All host traffic terminates on and is processed by the router.
- Eg. SSH, SNMP, BGP, OSPF, Tunnel termination and EIGRP.
- Control Plane transit subinterface
- receives all control-plane IP traffic that is software switched by the route processor.
- Control Plane cef-exception subinterface
Port-filter policy
- Blocks traffic destined to closed or nonlistened TCP/UDP ports
- Only works with the host subinterface.
- Maintains a global database of all open TCP and UDP ports on the router, including ports created by applications.
Queue Threshold Policy
- limits the number of unprocessed packets for a given higher level protocol allowed in the control-plane IP input queue.
Configuration
Control plane Policing
Versions prior to 12.4(4)T or if you only want to configure the aggregate interface

ip access-list extended coppacl-igp
 permit ospf any host 224.0.0.5
 permit ospf any host 224.0.0.6
 permit ospf any any
!
ip access-list extended coppacl-management
 permit tcp 10.0.0.0 0.255.255.255 any eq 22
 permit tcp 10.0.0.0 0.255.255.255 any eq telnet
 permit udp host 10.1.1.10 any eq snmp
 permit udp host 10.0.0.11 any eq ntp
!
ip access-list extended coppacl-monitoring
 permit icmp any any ttl-exceeded
 permit icmp any any port-unreachable
 permit icmp any any echo-reply
 permit icmp any any echo
!
ip access-list extended coppacl-critical-app
 permit udp host 0.0.0.0 host 255.255.255.255 eq bootps
 permit udp host 10.1.1.11 eq bootps any eq bootps
!
class-map match-all coppclass-igp
 match access-group name coppacl-igp
class-map match-all coppclass-management
 match access-group name coppacl-management
class-map match-all coppclass-monitoring
 match access-group name coppacl-monitoring
class-map match-all coppclass-critical-app
 match access-group name coppacl-critical-app
class-map match-all coppclass-layer2
 match protocol arp
!
policy-map copp-policy
 class coppclass-igp
 class coppclass-management
  police rate 250 pps conform-action transmit exceed-action drop
 class coppclass-monitoring
  police rate 50 pps conform-action transmit exceed-action drop
 class coppclass-critical-app
  police rate 75 pps conform-action transmit exceed-action drop
 class coppclass-layer2
  police rate 25 pps conform-action transmit exceed-action drop
 class class-default
  police rate 10 pps conform-action transmit exceed-action drop
!
control-plane
 service-policy input copp-policy
Port-filter policy
class-map type port-filter match-any portfilter-cmap
 match  closed-ports
!
policy-map type port-filter portfilter-pmap
 class portfilter-cmap
   drop
!
control-plane host
 service-policy type port-filter input portfilter-pmap
!
Queue-threshold policy
class-map type queue-threshold match-all queue-cmap
 match host-protocols
!
policy-map type queue-threshold queue-pmap
class queue-cmap
 queue-limit 100
!
control-plane host
 service-policy type queue-threshold input queue-pmap
Show output
B1rt1#sh control-plane host open-ports
Active internet connections (servers and established)
Prot        Local Address      Foreign Address                  Service    State
 tcp                 *:22                  *:0               SSH-Server   LISTEN
 tcp                 *:23                  *:0                   Telnet   LISTEN
 tcp                 *:80                  *:0                HTTP CORE   LISTEN
 tcp                 *:22       10.1.2.50:5954               SSH-Server ESTABLIS
 udp                 *:67                  *:0            DHCPD Receive   LISTEN
 udp                 *:68                  *:0             BootP client   LISTEN
 udp                *:123                  *:0                      NTP   LISTEN
B1rt1#sh control-plane host counters
Control plane host path counters :

Feature                  Packets Processed/Dropped/Errors

--------------------------------------------------------
TCP/UDP Portfilter           3337/2028/0
Protocol Queue Threshold      384/0/0

--------------------------------------------------------
B1rt1#sh control-plane counters
Feature Path             Packets processed/dropped/errors
Aggregate                  392996/2628/0
Host                         9373/2135/0
Transit                    369604/0/0
Cef-exception               11391/0/0
External Links
CoPP
CoP extended feature set
CoPP best practice design guide
DHCP Snooping
This page is part of the Netband Project
- DHCP snooping is a DHCP security feature that provides network security by filtering untrusted DHCP messages and by building and maintaining a DHCP snooping binding database, also referred to as a DHCP snooping binding table.
- The DHCP snooping bindings are also used by the security features Dynamic Arp Inspection and IP Source Guard.
Configuration
ip dhcp snooping vlan 3,5
ip dhcp snooping information option allow-untrusted
ip dhcp snooping
!
interface FastEthernet0/1
 description HQdc1
 ip dhcp snooping trust
!
Verification
HQSW1#sh ip dhcp snooping binding
MacAddress          IpAddress        Lease(sec)  Type           VLAN  Interface
------------------  ---------------  ----------  -------------  ----  --------------------
00:1B:2A:79:5F:53   10.1.2.52        208         dhcp-snooping  5     FastEthernet0/13
00:03:47:C9:9F:AC   10.1.1.10        218         dhcp-snooping  3     FastEthernet0/2
00:21:5A:F7:F1:01   10.1.2.50        51          dhcp-snooping  5     FastEthernet0/11
Total number of bindings: 3
HQSW1#sh ip dhcp snooping
Switch DHCP snooping is enabled
DHCP snooping is configured on following VLANs:
3,5
Insertion of option 82 is enabled
   circuit-id format: vlan-mod-port
    remote-id format: MAC
Option 82 on untrusted port is allowed
Verification of hwaddr field is enabled
Interface                    Trusted     Rate limit (pps)
------------------------     -------     ----------------
FastEthernet0/1              yes         unlimited
External Links
IP Source Guard
This page is part of the Netband Project
- IP source guard is a security feature that restricts IP traffic on nonrouted, Layer 2 interfaces by filtering traffic based on the DHCP snooping binding database and on manually configured IP source bindings. You can use IP source guard to prevent traffic attacks caused when a host tries to use the IP address of its neighbor.
- IP source guard is supported only on Layer 2 ports, including access and trunk ports
- An ACL is applied to the interface, which allows only IP traffic with a source IP address in the IP source binding table and denies all other traffic.
- Filtering options
- Source IP address
- The switch forwards IP traffic when the source IP address matches an entry in the DHCP snooping binding database or a binding in the IP source binding table.
- Source IP and MAC Address
- The switch forwards traffic only when the source IP and MAC addresses match an entry in the IP source binding table.
- Filters both ip and non-ip traffic
- Port security is used to filter source MAC addresses
- Is not supported on pvlan
- Source IP address
Configuration
DHCP snooping must be configured correctly, for IP source guard to work properly.
Source IP -and Mac address filtering
interface FastEthernet0/10
 ip verify source port-security
Source IP address filtering
interface FastEthernet0/10
 ip verify source
Statically assigned IP -and Mac address entry
ip source binding 0003.47C9.A1D8 vlan 3 10.1.1.11 interface Fa0/1
Verification
HQSW1#sh ip source binding
MacAddress          IpAddress        Lease(sec)  Type           VLAN  Interface
------------------  ---------------  ----------  -------------  ----  --------------------
00:03:47:C9:A1:D8   10.1.1.11        infinite    static         3     FastEthernet0/1
00:1B:2A:79:5F:53   10.1.2.52        185         dhcp-snooping  5     FastEthernet0/13
00:03:47:C9:9F:AC   10.1.1.10        233         dhcp-snooping  3     FastEthernet0/2
00:21:5A:F7:F1:01   10.1.2.50        228         dhcp-snooping  5     FastEthernet0/11
Total number of bindings: 4
External Links
Dynamic Arp Inspection (DAI)
This page is part of the Netband Project
- Dynamic ARP inspection is a security feature that validates ARP packets in a network. It intercepts, logs, and discards ARP packets with invalid IP-to-MAC address bindings using the DHCP snooping table. This capability protects the network from certain man-in-the-middle attacks.
- Dynamic ARP inspection is supported on access ports, trunk ports, EtherChannel ports, and private VLAN ports.
Configuration
DHCP snooping must be configured correctly, for Dynamic arp inspection to work properly.
ip arp inspection vlan 3,5
Verification
HQSW1#sh ip arp inspection

Source Mac Validation      : Disabled
Destination Mac Validation : Disabled
IP Address Validation      : Disabled

 Vlan     Configuration    Operation   ACL Match          Static ACL
 ----     -------------    ---------   ---------          ----------
    3     Enabled          Active
    5     Enabled          Active

 Vlan     ACL Logging      DHCP Logging
 ----     -----------      ------------
    3     Deny             Deny
    5     Deny             Deny

 Vlan      Forwarded        Dropped     DHCP Drops      ACL Drops
 ----      ---------        -------     ----------      ---------
    3            123            197            197              0
    5             15              0              0              0

 Vlan   DHCP Permits    ACL Permits   Source MAC Failures
 ----   ------------    -----------   -------------------
    3            123              0                     0
    5             15              0                     0

 Vlan   Dest MAC Failures   IP Validation Failures   Invalid Protocol Data
 ----   -----------------   ----------------------   ---------------------
    3                   0                        0                       0
    5                   0                        0                       0
External Links
Device hardening
This page is part of the Netband Project
Exclusive Configuration Change Access
- ensures that only one administrator makes configuration changes to a Cisco IOS device at a given time.
B1rt1(config)#<input>configuration mode exclusive auto</input>
!
B1rt1#<input>conf t</input>
Enter configuration commands, one per line.  End with CNTL/Z.
B1rt1(config)#
Apr 16 13:02:58.746:  Configuration mode locked exclusively. The lock will be cleared once you exit out of configuration mode using end/exit
B1rt1(config)#<input>interface fa0/0</input>
Configuration mode locked exclusively by user 'admin' process '56' from terminal '195'. Please try later.For more information see: Exclusive Configuration Change Access
Cisco IOS Software Resilient Configuration
- stores a copy of the Cisco IOS software image and device configuration that is currently being used by a Cisco IOS device.
- Can only be disabled through console access
secure boot-image
secure boot-config
B1rt1#<input>sh secure bootset</input>
IOS resilience router id FCZ111910E5

IOS image resilience version 12.4 activated at 11:05:51 UTC Thu Apr 16 2009
Secure archive flash:c2801-advipservicesk9-mz.124-9.T.bin type is image (elf) []
  file size is 30588892 bytes, run size is 30754576 bytes
  Runnable image, entry point 0x8000F000, run from ram

IOS configuration resilience version 12.4 activated at 11:06:11 UTC Thu Apr 16 2009
Secure archive flash:.runcfg-20090416-110611.ar type is config
configuration archive size 4555 bytes
B1rt1(config)#<input>no secure boot-config</input>
%You must be logged on the console to apply this commandB1rt1(config)#<input>secure boot-config restore flash:rescueconf</input>
ios resilience:configuration successfully restored as flash:rescueconfFor more information see: Cisco IOS Resilient Configuration
Reserve Memory for Console Access
- used in order to reserve enough memory to ensure console access to a Cisco IOS device
memory reserve console 4096For more information see: Reserve Memory for Console Access
Memory Leak Detector
- used in order to check the memory structures of a device and acquire the latest crash information to determine what processes corrupt the chunks.
scheduler heapcheck process memoryFor more information see: Memory Leak Detector
Buffer Overflow: Detection and Correction of Redzone Corruption
- A memory block overflow problem is detected in the Cisco IOS software when the value of an area in the memory block called the "redzone" is checked
- When a memory block overflow problem is detected in packet memory, software will change the memory block header data back to its correct value.
exception memory ignore overflow io
exception memory ignore overflow processor
show memory overflowFor more information see: Buffer Overflow: Detection and Correction of Redzone Corruption
EXEC Timeout
- logs out sessions on vty or tty lines that are left idle.
- Default is 10 minutes
line con 0
 exec-timeout 5
line vty 0 4
exec-timeout 5- on some older IOS versions the default is, no timeout
- when all lines are occupied, no one can log in until the device is restarted or the sessions are cleared through the console
B1rt1#<input>sh users</input>
    Line       User       Host(s)              Idle       Location
* vty 194      admin      idle                 00:00:00 10.1.2.50
  vty 195      admin2     idle                 00:00:03 10.1.2.50

B1rt1#<input>clear line 195</input>
[confirm]
 [OK]
B1rt1#
Disable Unused Services
no ip finger
ip dhcp bootp ignore
no service pad
no ip http server
no service config

On versions prior to 12.0, also do:
no service udp-small-servers
no service tcp-small-servers
No Service Password-Recovery
- Disables password recovery through ROMMON
- The router can be reset to factory default configuration, but the stored configuration is lost
no service password-recoveryFor more information see: No Service Password-Recovery
Password Management
- Uses Message Digest 5 (MD5) for password hashing
enable secret cisco- prevents casual observers from reading passwords
- weak password encryption
service password-encryptionLogin Password Retry Lockout
- locks an user account after a configured number of failed attempts
- must be manually unlocked again
- A user with privilege level 15 cannot be locked out
aaa new-model
aaa local authentication attempts max-fail 3
aaa authentication login default local
!
username admin2 privilege 14 secret cisco
Apr 16 12:36:41.257: %AAA-5-USER_LOCKED: User admin2 locked out on authentication failure
B1rt1#<input>clear aaa local user lockout username admin2</input>
Apr 16 12:39:57.474: %AAA-5-USER_UNLOCKED: User admin2 unlocked by admin on vty0 (192.168.0.11)For more information see: Login Password Retry Lockout
Cisco IOS Login Enhancements
- adds a delay between successive logins
- login shutdown(quiet mode) for a specified period of time
- Allows for speficied hosts or subnets to login in during quiet mode
login block-for 120 attempts 2 within 30
login delay 2
login on-failure log
login quiet-mode access-class 2
access-list 2 permit 10.0.0.0 0.255.255.255
Apr 16 15:30:29.249: %SEC_LOGIN-1-QUIET_MODE_ON: Still timeleft for watching failures is 0 secs, [user: ] [Source: 192.168.3.12] [localport: 22] [Reason: Login Authentication Failed] [ACL: sl_def_acl] at 15:30:29 UTC Thu Apr 16 2009
Note: The sl_def_acl is created by the system and cannot be removed or modified
Extended IP access list sl_def_acl
10 deny tcp any any eq telnet log
20 deny tcp any any eq www log
30 deny tcp any any eq 22 log
40 permit tcp any any eq 22 log
Apr 16 15:32:29.252: %SEC_LOGIN-5-QUIET_MODE_OFF: Quiet Mode is OFF, because block period timed out at 15:32:29 UTC Thu Apr 16 2009B1rt1#<input>sh login failures</input>
Total failed logins: 7
Detailed information about last 50 failures
Username SourceIPAddr lPort Count TimeStamp
10.248.10.98 22 2 07:30:17 UTC Sun Dec 14 2008
10.1.0.53 22 1 21:27:15 UTC Mon Dec 22 2008
192.168.3.10 22 2 15:02:23 UTC Thu Jan 8 2009
192.168.3.12 22 2 15:30:17 UTC Thu Apr 16 2009B1rt1#<input>sh login</input>
A login delay of 2 seconds is applied.
Quiet-Mode access list 2 is applied.
Router enabled to watch for login Attacks.
If more than 2 login failures occur in 30 seconds or less,
logins will be disabled for 120 seconds.
Router presently in Normal-Mode.
Current Watch Window
Time remaining: 8 seconds.
Login failures for current window: 0.
Total login failures: 7.Encrypting Management Sessions
- use SSH instead of telnet
- use HTTPS instead of HTTP
ip domain-name netband.dk
!
B1rt1(config)#<input>crypto key generate rsa</input>
Choose the size of the key modulus in the range of 360 to 2048 for your
  General Purpose Keys. Choosing a key modulus greater than 512 may take
  a few minutes.

How many bits in the modulus [512]:2048
% Generating 2048 bit RSA keys, keys will be non-exportable...[OK]

B1rt1(config)#
Apr 16 12:50:47.916: %SSH-5-ENABLED: SSH 2.0 has been enabled

B1rt1(config)#<input>ip ssh time-out 60</input>
B1rt1(config)#<input>ip ssh authentication-retries 3</input>

B1rt1#<input>sh ip ssh</input>
SSH Enabled - version 2.0
Authentication timeout: 60 secs; Authentication retries: 3
B1rt1(config)#<input>no ip http server</input>
B1rt1(config)#<input>ip http secure-server</input>
% Generating 1024 bit RSA keys, keys will be non-exportable...[OK]Control vty and tty Lines
- Disable unwanted access methods to and from the virtual lines
- Use access-lists to control access to the virtual lines
line vty 0 4
 transport input ssh
 transport output ssh
 access-class 2 in
line vty 5
 transport input ssh
 transport output ssh
 access-class 2 in
!
access-list 2 permit 10.0.0.0 0.255.255.255
Mangement Plane Protection
- restricts management to one or more logical or physical interfaces
- Can be used as an alternative to vty access-list and interface access-lists
- Works with ftp, http, https, ssh, telnet, tftp and snmp
control-plane host
management-interface FastEthernet0/0 allow ssh

Apr 16 20:04:32.067: %CP-5-FEATURE: Management-Interface feature enabled on Control plane host path
B1rt1#<input>show management-interface</input>
Management interface FastEthernet0/0
Protocol Packets processed
ssh 223981For more information see: Management Plane Protection
External links
Cisco Guide to Harden Cisco IOS Devices
Embedded Event Manager (EEM)
This page is part of the Netband Project
Embedded Event Manager is a service on IOS based routers witch monitors the system and takes action on events like log messages, routing updates or specific time of day.
Configuration
This code shows how to monitor the log for successfull login attempts and send an email.
event manager applet LogIn-Succeded event syslog pattern "SSH-5-SSH2_USERAUTH.*Succeeded" maxrun 20
action 1.0 mail server "<ip-adr-of-smtp-server>" to "admin@mydoamin.com" from "router@mydomain.com" subject "Login Succeeded" body "$_syslog_msg"
This code shows how to maintain a consistent configuration backup without extra work. This sends a mail with the configuration each time a write command is issued.
event manager applet ConfigChange-Write_Memory
event cli pattern "write memory" sync no skip no
action 1.0 cli command "enable"
action 1.1 cli command "show run"
action 2.0 mail server "<ip-adr-of-smtp-server>" to "admin@mydomain.dk" from "router@mydomain.com" subject "Running config dump" body "$_cli_result"

event manager applet ConfigChange-wr
event cli pattern "wr" sync no skip no
action 1.0 cli command "enable"
action 1.1 cli command "show run"
action 2.0 mail server "<ip-adr-of-smtp-server>" to "admin@mydomain.com" from "router@mydomain.com" subject "Running config dump" body "$_cli_result"
External links
Zone based Firewall(ZFW)
This page is part of the Netband Project
Branch router with DMZ
In this example the configuration will what you would expect from a branch office with an inside, outside and a DMZ interface for local servers. ZFW is not like IOS firewalling with ip inspect, the inspect firewall is a per interface rule firewall where ZFW is a direction firewall with one-to-one, one-to-many or many-to-many.
Vlans
Creating vlans to make the vlan interfaces on
vlan 2
 name INSIDE
vlan 3
 name OUTSIDE
vlan 4
 name DMZ
Security zones
Declaring Zones which will be mapped to the interfaces
zone security INSIDE-ZONE
zone security OUTSIDE-ZONE
zone security DMZ-ZONE
Vlan interfaces
Creating vlan interfaces for the different zones
interface vlan 2
 description Inside interface
 ip address 10.0.0.1 255.255.255.0
 zone-member security INSIDE-ZONE
!
interface vlan 3
 description Outside interface
 ip address 80.225.34.13 255.255.255.0
 zone-member security OUTSIDE-ZONE
!
interface vlan 4
 description DMZ interface
 zone-member security DMZ-ZONE
Customizing your matches
If you need a custom tcp port to be allowed to pass through the zones
ip port-map user-streaming port tcp 8000 description Custom Video Streaming port
Create a parameter map of regular expressions your http requests will be matched against
parameter-map type regex URLS-PARAMAP
 pattern ..*cmd.exe.
 pattern ..*sex.
 pattern ..*gambling.
Class-maps
This will specify what traffic the class-maps will match on.
class-map type inspect match-any INSIDE-OUTSIDE-CMAP
 match protocol tcp
 match protocol udp
 match protocol icmp
!
class-map type inspect match-any INSIDE-DMZ-CMAP
 match protocol tcp
 match protocol udp
 match protocol icmp
!
class-map type inspect match-any OUTSIDE-DMZ-CMAP
 match protocol http
 match protocol https
 match protocol user-streaming
!
class-map type inspect http match-all URLS-CMAP
 match request uri regex URLS-PARAMAP
Policy-maps
This will make a policy-map witch will descripe what actions to take on the trafik that matches our class-maps
policy-map type inspect http URLS-PMAP
 class type inspect http URLS-CMAP
  reset
 class class-default
!
policy-map type inspect OUTSIDE-DMZ-PMAP
 class type inspect OUTSIDE-DMZ-CMAP
  inspect
 class class-default
  drop
!
policy-map type inspect INSIDE-OUTSIDE-PMAP
 class type inspect INSIDE-OUTSIDE-CMAP
  inspect
 service-policy http URLS-PMAP
 class class-default
  drop
!
policy-map type inspect INSIDE-DMZ-PMAP
 class type inspect INSIDE-DMZ-CMAP
  inspect
 class class-default
  drop
Zone-pairs
And the we need to map zones together in zone-pairs with a traffic direction and connect the policy-maps to them
zone-pair security INSIDE-OUTSIDE-ZONEP source INSIDE-ZONE destination OUTSIDE-ZONE
 service-policy type inspect INSIDE-OUTSIDE-PMAP
!
zone-pair security INSIDE-DMZ-ZONEP source INSIDE-ZONE destination DMZ-ZONE
 service-policy type inspect INSIDE-DMZ-PMAP
!
zone-pair security OUTSIDE-DMZ-ZONEP source OUTSIDE-ZONE destination DMZ-ZONE
 service-policy type inspect OUTSIDE-DMZ-PMAP
Nifty Features
All this zone-based firewalling is not only a layer3 thing.
Try creating a bridging interface and make it your Layer3 link and assign two vlan to that bridge group. Now it is possible to place 2 servers in different vlans, but in the same layer 2 subnet and still have a firewall between them.
Now you have a Layer 2 firewall:-)
External links
http://www.cisco.com/en/US/products/sw/secursw/ps1018/products_tech_note09186a00808bc994.shtml
http://www.cisco.com/en/US/docs/ios/sec_data_plane/configuration/guide/sec_zone_polcy_firew.html
IOS Firewall Feature set
This page is part of the Netband Project
Context Based Access Control (CBAC)
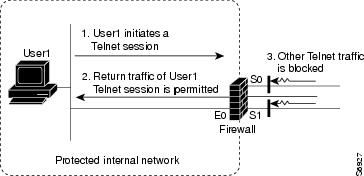
- filters TCP and UDP packets based on application-layer protocol session information.
- more flexible than access control lists, that checks packets at the network layer, or at most, the transport layer
- inspects packet sequence numbers in TCP connections
- detects unusually high rates of new connections and issue alert messages.
- creates temporary openings in the return acl to allow traffic back in.
Configuration
- Note: The router only keeps track of the configured protocols. Unconfigured protocols are allowed through without inspection or tracking if the interface acls permit
 ip inspect audit-trail
 ip inspect name iosfw ftp
 ip inspect name iosfw tcp
 ip inspect name iosfw udp
 ip inspect name iosfw http
 ip inspect name iosfw https
!
interface FastEthernet0/0
 description OUTSIDE
 ip inspect iosfw out
 ip access-group 101 in
!
 access-list 101 permit udp any eq isakmp any eq isakmp
 access-list 101 permit esp any any
 access-list 101 permit tcp any any eq 22
 access-list 101 deny   ip any any log
Verification
B1rt1#sh ip inspect sessions
Established Sessions
 Session 65E14830 (10.2.1.10:3935)=>(195.137.194.128:80) http SIS_OPEN
 Session 65E15310 (10.2.1.10:3936)=>(195.137.194.128:80) http SIS_OPEN
 Session 65E15058 (10.2.1.10:3937)=>(195.137.194.128:80) http SIS_OPEN
 Session 65E155C8 (10.2.1.10:3934)=>(195.137.194.128:80) http SIS_OPEN
- Syslog audit trail
Apr 27 10:22:06.521: %FW-6-SESS_AUDIT_TRAIL_START: Start http session: initiator (10.2.1.10:3898) -- responder (195.137.194.128:80)
Apr 27 10:22:18.044: %FW-6-SESS_AUDIT_TRAIL: Stop http session: initiator (10.2.1.10:3898) sent 1247 bytes -- responder (195.137.194.128:80) sent 144791 bytes

Apr 27 10:48:36.770: %FW-6-SESS_AUDIT_TRAIL_START: Start tcp session: initiator (10.2.1.10:3958) -- responder (192.168.1.1:23)
Apr 27 10:49:30.769: %FW-6-SESS_AUDIT_TRAIL: Stop tcp session: initiator (10.2.1.10:3958) sent 74 bytes -- responder (192.168.1.1:23) sent 255 bytes
Intrusion Prevention System (IPS)
- See Netband Project - IOS ips for further information and configuration
Authentication Proxy (Incomplete)
- can be used to authenticate and authorize
aaa authorization auth-proxy default group RTP
ip auth-proxy auth-proxy-banner
ip auth-proxy auth-cache-time 10
ip auth-proxy name auth_proxy_acl http
!
ip auth-proxy auth_proxy_acl
Port to Application Mapping (PAM)
- customize TCP or UDP port numbers for network services or applications.
- information in the PAM table enables CBAC supported services to run on nonstandard ports
- allows cbac to track user customized ports
Configuration
ip port-map http port tcp 8001 description Alternative http port
...
ip inspect name iosfw http
...
- The same port can be mapped to different services on different hosts
access-list 10 permit 10.2.1.10
access-list 20 permit 10.2.1.11
ip port-map http port 8001 list 10
ip port-map http ftp 8001 list 20
- User-defined port map
ip port-map user-streaming port tcp 8000 description Custom Video Streaming port
...
ip inspect name iosfw user-streaming
...
Verification
B1rt1#sh ip port-map http
Default mapping:  http                 tcp port 80                         system defined
Default mapping:  http                 tcp port 8001                       user defined
B1rt1#sh ip port-map
...
Default mapping:  user-streaming       tcp port 8000                       user defined
...
External Links
Cisco IOS Security Configuration Guide
IOS Intrusion Prevention System
This page is part of the Netband Project
Intrusion Prevention System signature version 4
ip ips sdf location flash:128MB.sdf
!
ip ips name B1rt1ips
!
interface FastEthernet0/0
 ip ips B1rt1ips in
!
B1rt1(config-if)#ip ips B1rt1ips in
.Apr 20 07:12:56.993: %IPS-6-SDF_LOAD_SUCCESS: SDF loaded successfully from flash:128MB.sdf
.Apr 20 07:12:56.993: %IPS-6-ENGINE_BUILDING: OTHER - 8 signatures - 1 of 15 engines
.Apr 20 07:12:56.993: %IPS-6-ENGINE_READY: OTHER - 0 ms - packets for this engine will be scanned
.Apr 20 07:12:56.993: %IPS-6-ENGINE_BUILDING: MULTI-STRING - 0 signatures - 2 of 15 engines
.Apr 20 07:12:56.993: %IPS-6-ENGINE_BUILD_SKIPPED: MULTI-STRING - there are no new signature definitions for this engine
.Apr 20 07:12:56.993: %IPS-6-ENGINE_BUILDING: STRING.ICMP - 2 signatures - 3 of 15 engines
.Apr 20 07:12:57.045: %IPS-6-ENGINE_READY: STRING.ICMP - 52 ms - packets for this engine will be scanned
.Apr 20 07:12:57.045: %IPS-6-ENGINE_BUILDING: STRING.UDP - 24 signatures - 4 of 15 engines
.Apr 20 07:12:57.989: %IPS-6-ENGINE_READY: STRING.UDP - 944 ms - packets for this engine will be scanned
.Apr 20 07:12:57.989: %IPS-6-ENGINE_BUILDING: STRING.TCP - 125 signatures - 5 of 15 engines
Apr 20 07:13:39.955: %IPS-6-ENGINE_READY: STRING.TCP - 41976 ms - packets for this engine will be scanned
Apr 20 07:13:39.955: %IPS-6-ENGINE_BUILDING: SERVICE.FTP - 1 signatures - 6 of 15 engines
Apr 20 07:13:39.979: %IPS-6-ENGINE_READY: SERVICE.FTP - 24 ms - packets for this engine will be scanned
Apr 20 07:13:39.979: %IPS-6-ENGINE_BUILDING: SERVICE.SMTP - 3 signatures - 7 of 15 engines
Apr 20 07:13:40.043: %IPS-6-ENGINE_READY: SERVICE.SMTP - 64 ms - packets for this engine will be scanned
Apr 20 07:13:40.043: %IPS-6-ENGINE_BUILDING: SERVICE.RPC - 38 signatures - 8 of 15 engines
Apr 20 07:13:40.327: %IPS-6-ENGINE_READY: SERVICE.RPC - 284 ms - packets for this engine will be scanned
Apr 20 07:13:40.327: %IPS-6-ENGINE_BUILDING: SERVICE.DNS - 29 signatures - 9 of 15 engines
Apr 20 07:13:40.367: %IPS-6-ENGINE_READY: SERVICE.DNS - 40 ms - packets for this engine will be scanned
Apr 20 07:13:40.367: %IPS-6-ENGINE_BUILDING: SERVICE.HTTP - 100 signatures - 10 of 15 engines
Apr 20 07:13:49.340: %IPS-6-ENGINE_BUILDING: ATOMIC.TCP - 7 signatures - 11 of 15 engines
Apr 20 07:13:49.348: %IPS-6-ENGINE_READY: ATOMIC.TCP - 8 ms - packets for this engine will be scanned
Apr 20 07:13:49.348: %IPS-6-ENGINE_BUILDING: ATOMIC.UDP - 3 signatures - 12 of 15 engines
Apr 20 07:13:49.352: %IPS-6-ENGINE_READY: ATOMIC.UDP - 4 ms - packets for this engine will be scanned
Apr 20 07:13:49.352: %IPS-6-ENGINE_BUILDING: ATOMIC.ICMP - 3 signatures - 13 of 15 engines
Apr 20 07:13:49.352: %IPS-6-ENGINE_READY: ATOMIC.ICMP - 0 ms - packets for this engine will be scanned
Apr 20 07:13:49.352: %IPS-6-ENGINE_BUILDING: ATOMIC.IPOPTIONS - 2 signatures - 14 of 15 engines
Apr 20 07:13:49.356: %IPS-6-ENGINE_READY: ATOMIC.IPOPTIONS - 4 ms - packets for this engine will be scanned
Apr 20 07:13:49.356: %IPS-6-ENGINE_BUILDING: ATOMIC.L3.IP - 6 signatures - 15 of 15 engines
Intrusion Prevention System signature version 5
- IOS Release 12.4(15)T3 or later
- Download the newest ios ips package from cisco, format: IOS-Sxxx-CLI.pkg
- Could not be tested, because the routers available did not have enough ram to support the required ios image
ip ips name B1rt1ips
ip ips config location flash:ips
!
ip ips notify sdee
!
ip ips signature-category
 category all
  retired true
 category ios_ips basic
  retired false
!
interface FastEthernet0/0
 ip ips B1rt1ips in
- copy the ips package to the router
copy ftp://<ftp:ftppw@10.2.1.50/IOS-S340-CLI.pkg idconf
External links
Version 5 signature configuration
IPSec/Gre
This page is part of the Netband Project
Configuration for the Head-End
This configuration is for the "server" part of the tunnel, with the static IP.
crypto isakmp policy 10
 encr aes 256
 authentication pre-share
 group 5
 lifetime 1000
!
crypto isakmp key CiscoDisco address 0.0.0.0 0.0.0.0
!
crypto ipsec transform-set Netband-AES256-SHA esp-aes 256 esp-sha-hmac
!
crypto dynamic-map Netband-dynamic 10
 description Hmmm
 set transform-set Netband-AES256-SHA
!
crypto map Netband-crypto 10 ipsec-isakmp dynamic Netband-dynamic
!
interface Tunnel0
 ip address 10.255.254.1 255.255.255.252
 ip mtu 1420
 tunnel source Loopback1
 tunnel destination 10.255.253.2
!
interface Loopback1
 ip address 10.255.253.1 255.255.255.255
!
ip route 10.255.253.2 255.255.255.255 192.168.0.1
Configuration for the Branch
This configuration is for the "client" part of the tunnel, with the dynamic IP.
crypto isakmp policy 10
 encr aes 256
 authentication pre-share
 group 5
 lifetime 1000
!
crypto isakmp key CiscoDisco address 192.168.0.11
!
crypto ipsec transform-set Netband-AES256-SHA esp-aes 256 esp-sha-hmac
!
crypto map Netband-crypto 10 ipsec-isakmp
 set peer 192.168.0.11
 set transform-set Netband-AES256-SHA
 match address Tunnel_to_HQ
!
interface Tunnel0
 ip address 10.255.254.2 255.255.255.252
 ip mtu 1420
 tunnel source Loopback1
 tunnel destination 10.255.253.1
!
interface Loopback1
 ip address 10.255.253.2 255.255.255.255
!
ip access-list extended Tunnel_to_HQ
 permit gre host 10.255.253.2 host 10.255.253.1
!
ip route 10.255.253.1 255.255.255.255 FastEthernet0/0
External links
http://www.cisco.com/en/US/docs/ios/12_3/security/command/reference/sec_c2g.html#wp1073142
http://www.cisco.com/en/US/docs/solutions/Enterprise/WAN_and_MAN/P2P_GRE_IPSec/5_p2pGRE.html#wp84798
Multicast
This page is part of the Netband Project
- A multicast server is installed on the server HQDC1
Configuration
- Switch
- Only configuration from HQSW1 is shown, as the configuration on B1SW1 is identical
ip multicast-routing distributed
!
interface FastEthernet0/24
 description HQrt1
 no switchport
 ip address 10.255.255.1 255.255.255.252
 ip pim sparse-dense-mode
 ip ospf network point-to-point
 ip ospf dead-interval minimal hello-multiplier 4
!
interface Vlan3
 ip address 10.1.1.1 255.255.255.0
 ip pim sparse-dense-mode
!
ip pim rp-address 10.0.0.12
- Routers
- Only configuration from HQSRT1 is shown, as the configuration on B1RR1 is identical
ip multicast-routing
!
interface Tunnel0
 ip address 10.255.254.1 255.255.255.252
 ip mtu 1300
 ip pim sparse-dense-mode
 ip virtual-reassembly
 tunnel source Loopback1
 tunnel destination 10.255.253.2
!
interface FastEthernet0/1
 description HQSW1
 ip address 10.255.255.2 255.255.255.252
 ip pim sparse-dense-mode
 ip nat inside
 ip virtual-reassembly
 ip ospf network point-to-point
 ip ospf dead-interval minimal hello-multiplier 4
 duplex auto
 speed auto
!
Verification
B1sw1#sh ip mroute
...
(10.1.1.11, 239.0.0.40), 00:11:05/00:02:54, flags: JT
  Incoming interface: FastEthernet0/2, RPF nbr 10.255.255.14
  Outgoing interface list:
    Vlan5, Forward/Sparse, 00:11:05/00:02:48
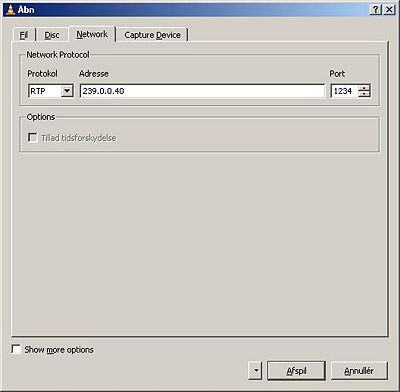
- Vlc is used as a the stream client
Link
Use iPerf as the multicast sender and listener
Private Vlan(Incomplete)
Private vlan port types:
1. Promiscuous port
- Can communicate with all isolated or community vlans
- Usually used as default gateway for the isolated and community pvlans
2. Isolated port
- Full layer 2 isolation between host on the same pvlan
- Can only communicate with a promiscuous port
3. Community port
- Can communicate with other hosts in the same community
- Can communicate with the promiscouous port
SNMPv3
This page is part of the Netband Project
- provides secure access to devices by authenticating and encrypting packets over the network.
| Level |
Authentication |
Encryption |
| noAuthNoPriv |
Username |
no |
| authNoPriv |
md5 or sha |
no |
| authPriv |
md5 or sha |
des |
Configuration
snmp-server group mrtg-snmp-group v3 priv
!
snmp-server user mrtg-user mrtg-snmp-group v3 auth sha ciscodisco priv des ciscodisco
!
HQRT1#sh snmp user
User name: mrtg-user
Engine ID: 800000090300001BD40F8AA4
storage-type: nonvolatile active
Authentication Protocol: SHA
Privacy Protocol: DES
Group-name: mrtg-snmp-group
root@hqmgmt1:~# snmpget -v3 -a sha -u mrtg-user -x des -A ciscodisco -X ciscodisco -l authpriv 10.0.0.11 1.3.6.1.2.1.1.3.0

DISMAN-EVENT-MIB::sysUpTimeInstance = Timeticks: (77270968) 8 days, 22:38:29.68
- enable the router to send snmp notifications when a certain event takes place, like linkup/down, ospf state changes and many more.
snmp-server enable traps
snmp-server host 10.1.1.10 version 3 priv mrtg-user ospf
External links
Cisco IOS Network Management Configuration Guide, Release 12.4T
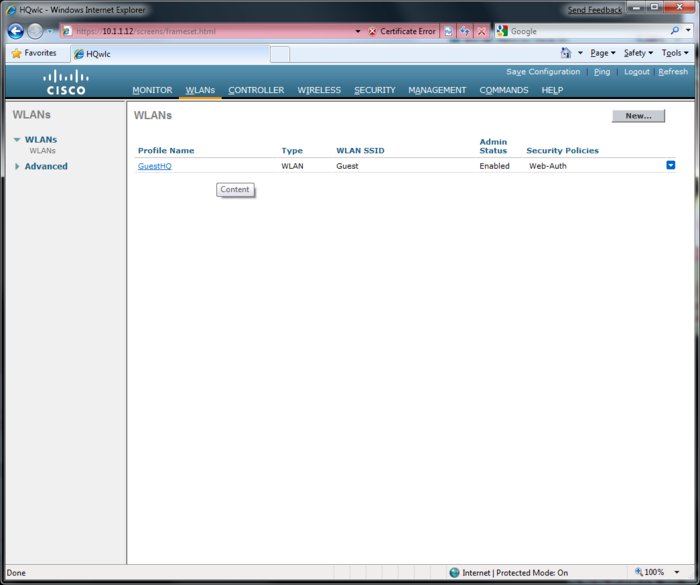
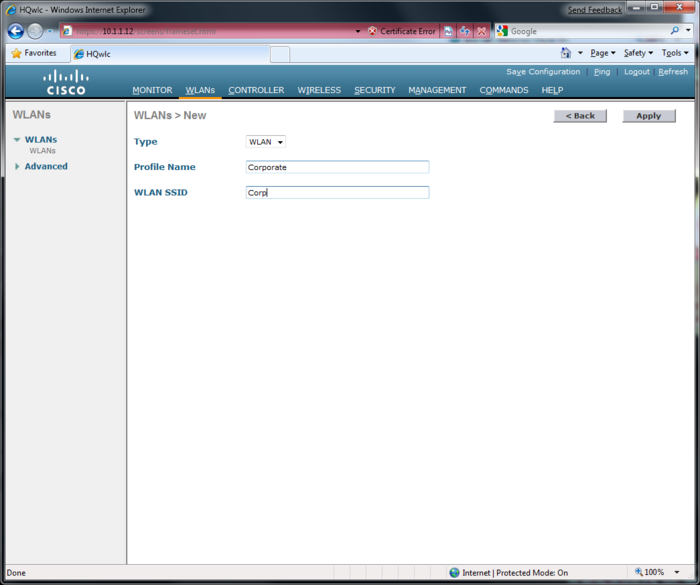
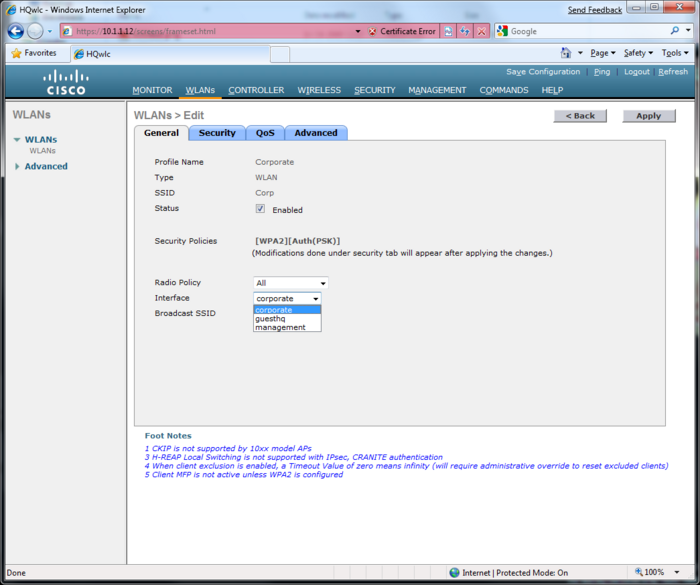
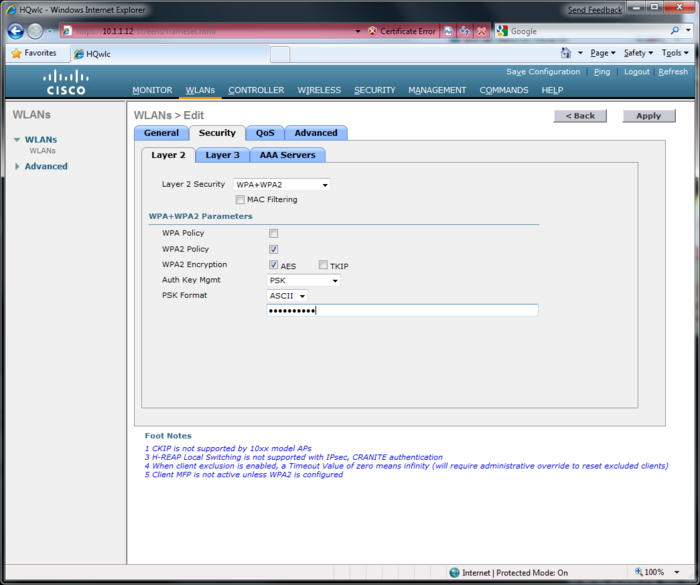
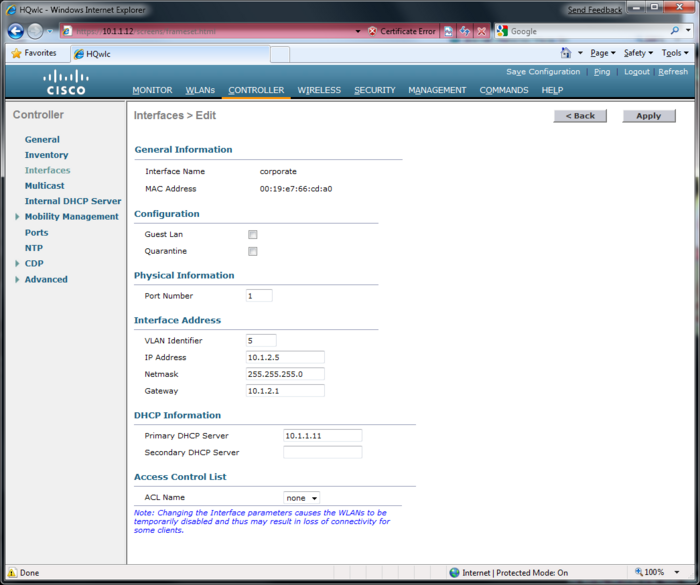
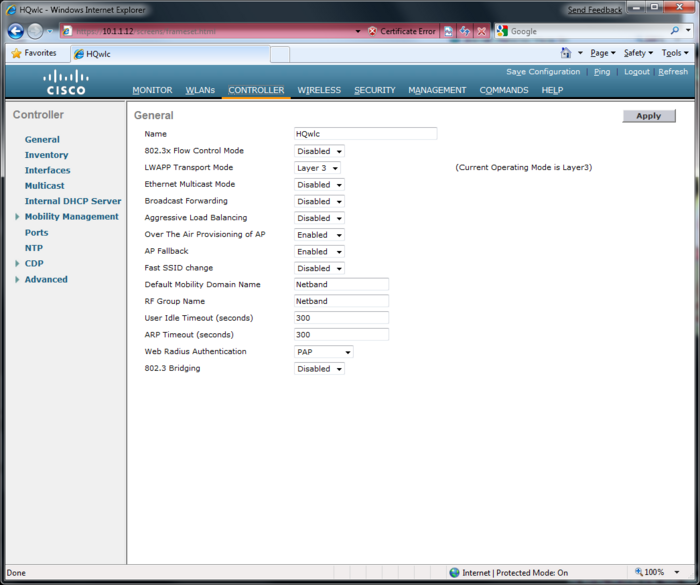
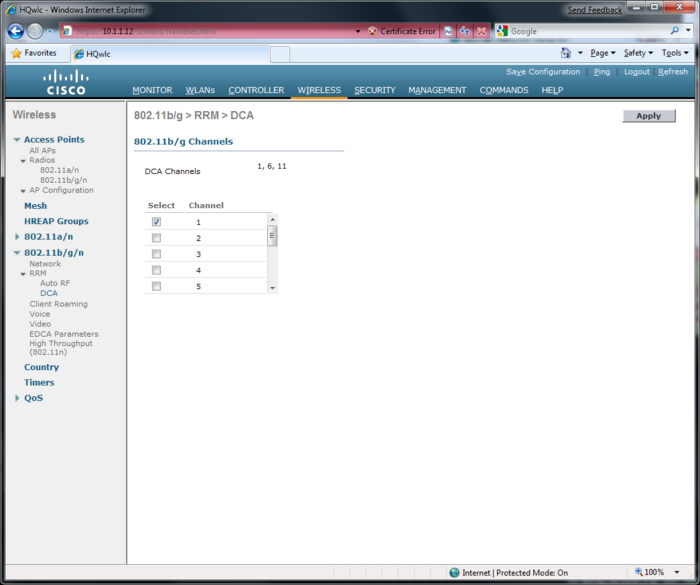
Wireless Lan Controller(WLC)
This page is part of the Netband Project
Default username and Password: Cisco/Cisco
Dhcp option 43
http://www.cisco.com/en/US/tech/tk722/tk809/technologies_configuration_example09186a00808714fe.shtml
Note: lwapp adds additional overhead to the transmitted data and control packets, so some adjustment to the mtu sizes might be required to get the lwap to join the controller over ipsec/gre links, mpls or pppoe. Configuration guides
http://www.cisco.com/en/US/products/ps7206/products_installation_and_configuration_guides_list.html
External links
http://www.cisco.com/en/US/prod/collateral/wireless/ps7183/ps469/product_data_sheet09186a008008883b.html
Wlc 4.2 configuration
IOS and Linux Goodies
This page is part of the Netband Project
IOS Goodies
- send messages to other adminsitrative users through the cli
B1rt1#send *
Enter message, end with CTRL/Z; abort with CTRL/C:
hej hej
^Z
Send message? [confirm]
B1rt1#
***
***
*** Message from tty194 to all terminals:
***
hej hej
B1rt1#
***
***
*** Message from tty194 to all terminals:
***
hej hej
- disable password check on telnet sessions
line vty 0 4
 no login
line vty 5 15
 no login
- log straight into privilege mode
aaa new-model
username admin privilige 15 password cisco
!
aaa authentication login default group local
aaa authorization console
aaa authorization exec default local
- tells the router to hold messages until it detects no input from the keyboard and no other output from the router.
line con 0
 logging synchronous
line aux 0
line vty 0 4
 logging synchronous
line vty 5
 logging synchronous
- Show the configuration from a user specified point
Switch#sh run | begin router ospf
router ospf 1
 router-id 192.168.1.2
 log-adjacency-changes
 passive-interface FastEthernet0/5
 network 192.168.1.2 0.0.0.0 area 0
 network 192.168.1.6 0.0.0.0 area 0
- Or type / at --more-- and the string you are searching for
Switch#sh run
Building configuration...
<output omitted>
/router ospf
filtering...
router ospf 1
 router-id 192.168.1.2
 log-adjacency-changes
 passive-interface FastEthernet0/5
 network 192.168.1.2 0.0.0.0 area 0
 network 192.168.1.6 0.0.0.0 area 0
- Macros can be used to execute multiple commands at once (only on switches)
Switch(config)# interface range fa0/1 - 24
Switch(config-if-range)# switchport host

switchport mode will be set to access
spanning-tree portfast will be enabled
channel group will be disabled
- User definded macro
Switch(config)#macro name test
Enter macro commands one per line. End with the character '@'.

switchport access vlan $VLANID
@
Switch(config-if)#do sh run interface fa0/15
Building configuration...

Current configuration : 132 bytes
!
interface FastEthernet0/15
 switchport access vlan 3
 switchport mode access
 spanning-tree portfast
end

Switch(config-if)#macro apply test 5
Switch(config-if)#do sh run interface fa0/15
Building configuration...

Current configuration : 139 bytes
!
interface FastEthernet0/15
 switchport access vlan 5
 switchport mode access
 macro description test
 spanning-tree portfast
end
- View the contents of a file in filesystem
fiber01#dir
Directory of flash:/

    1  -rw-    22245164  Nov 10 2008 21:42:56 +00:00  c180x-adventerprisek9-mz.124-15.XY4.bin
    2  -rw-         780  Nov 11 2008 15:40:14 +00:00  vlan.dat
    3  -rw-       12421  Jun 17 2009 10:25:24 +02:00  config.txt

31932416 bytes total (9359360 bytes free)
fiber01#more flash:config.txt
!
version 12.4
service timestamps debug datetime msec
service timestamps log datetime localtime
service password-encryption
!
hostname fiber01
!
boot-start-marker
boot-end-marker
<output omitted>
Linux Godies
- When you look at logs and need realtime monitoring use the -f argument on tail. If you've changed something in the MRTG config file and want to know if it is correct use "tail -f /var/log/mrtg/mrtg.log" to monitor the log.
root@UbuntuBox:~# tail -f /var/log/mrtg/mrtg.log
2009-04-20 08:30:05: ERROR: Target[Router][_IN_] 'Di $target->[14]{$mode} ' (kill): Can't call method "Di" on unblessed reference at (eval 42) line 1.
2009-04-20 08:30:05: ERROR: Target[Router][_OUT_] 'Di $target->[14]{$mode} ' (kill): Can't call method "Di" on unblessed reference at (eval 43) line 1.
2009-04-20 08:35:03: ERROR: Target[Router][_IN_] 'Di $target->[14]{$mode} ' (kill): Can't call method "Di" on unblessed reference at (eval 42) line 1.
2009-04-20 08:35:03: ERROR: Target[Router][_OUT_] 'Di $target->[14]{$mode} ' (kill): Can't call method "Di" on unblessed reference at (eval 43) line 1.
- Linux network emulater
- Can be used to emulate slow wan links with packet drops, delay and jitter
http://www.linuxfoundation.org/en/Net:Netem
- Network Connection Bridge
- This can be used to bridge two ethernet connections under ubuntu
https://help.ubuntu.com/community/NetworkConnectionBridge
Ubuntu Server
This page is part of the Netband Project
OS version:
FreeNac(Incomplete)
- Dynamic Virtual LAN management and assignment per end-device
- LAN Access control (authentication, authorization)
MRTG
- Network monitoring
1. Install the MRTG package
$ sudo aptitude install mrtg
2. Create the initial config file and poll a device
sudo cfgmaker --output /home/mrtg/mrtg.cfg ciscodisco@10.0.0.21 [comunity@router/switch IP]
# Created by
# /usr/bin/cfgmaker --output /home/mrtg/10.0.0.21.cfg ciscodisco@10.0.0.21 [comunity@router/switch IP]


### Global Config Options

#  for UNIX
# WorkDir: /home/http/mrtg

#  for Debian
WorkDir: /var/www/mrtg

#  or for NT
# WorkDir: c:\mrtgdata

### Global Defaults

#  to get bits instead of bytes and graphs growing to the right
# Options[_]: growright, bits, unknaszero

EnableIPv6: no

Include: /home/mrtg/10.0.0.21.cfg
For more information see cfgmaker
3. Either create additional cfg files for other devices, and copy/paste the relevant parts to the mrtg.cfg file or add them manually
4. Start MRTG
$ sudo env LANG=C /usr/bin/mrtg /home/mrtg/mrtg.cfg
5. Make MRTG run every 5 minutes
$sudo crontab  -e

#        m      h       dom     mon     dow     command
         */5      *       *       *       *       env LANG=C /usr/bin/mrtg /home/mrtg/mrtg.cfg  --logging /var/log/mrtg/mrtg.log
- If snmpv3 is needed, install the net:snmp module
$aptitude install libnet-snmp-perl
- If you want automatic index genereation with indexmaker
$sudo crontab  -e

#        m      h       dom     mon     dow     command
*/5      *       *       *       *       /usr/bin/indexmaker /home/mrtg/mrtg.cfg > /var/www/mrtg/index.html
Make apache run perl script
This will install the perl module in apache
$ sudo aptitude install libapache2-mod-perl2
This addition in /etc/apache2/apache2.conf configuration file will allow cgi and perl script to be run in every directory, not just cgi-bin/.
AddHandler cgi-script .cgi .pl

<Files ~ "\.pl$">
Options +ExecCGI
</Files>
<Files ~ "\.cgi$">
Options +ExecCGI
</Files>
Perl Scripts
If you want a index page to show all the mrtg graphs in one page create a new textfile and name it index.pl in your mrtg root folder. The indexfile should look like this
#!/usr/bin/perl -w
#############################################
# This script is created by Rasmus Elmholt  #
#############################################
use strict;
use CGI::Carp qw(fatalsToBrowser);

print "Content-type: text/html\n\n";

print '<?xml version="1.0" encoding="iso-8859-1"?>' , "\n";
print '<!DOCTYPE html PUBLIC "-//W3C//DTD XHTML 1.1//EN"' , "\n";
print '"http://www.w3.org/TR/xhtml11/DTD/xhtml11.dtd">' , "\n";
print '<html xmlns="http://www.w3.org/1999/xhtml" xml:lang="da">' , "\n";
print "<head><title>MRTG Network Monitoring</title></head><body>\n";


open(MRTGFILE, "/home/mrtg/mrtg.cfg");

while(my $line = <MRTGFILE>)
{
 if($line =~ /^Include:/)
 {
  $line =~ /^Include:\s(.*)/;
  open(MRTGFILE1, $1);
  #print "Found Include file";
  while(my $line1 = <MRTGFILE1>)
  {
   #print "line in Include: $line1<br>";
   if($line1 =~ /^PageTop/)
   {
    $line1 =~ /^PageTop\[(.*)\]:\s(.*)/;
    my $url = lc($1);
    print "<a href=\"$url.html\">$2</a><img src=\"$url-day.png\" /><img src=\"$url-week.png\" /><br /><br />";
   }
  }
 }
 if($line =~ /^PageTop/)
 {
  $line =~ /^PageTop\[(.*)\]:\s(.*)/;
  my $url = lc($1);
  print "<a href=\"$url.html\">$2</a><img src=\"$url-day.png\" /><img src=\"$url-week.png\" /><br /><br />";
 }
}
close(MRTGFILE);


print "</body></html>\n";
Remember to make it executable with chmod +x index.pl
External links
FreeNac
MRTG
RDDTool
Ubuntu Server Guide
Windows 2003 Server
This page is part of the Netband Project
DHCP
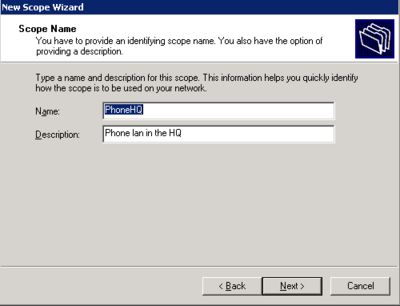
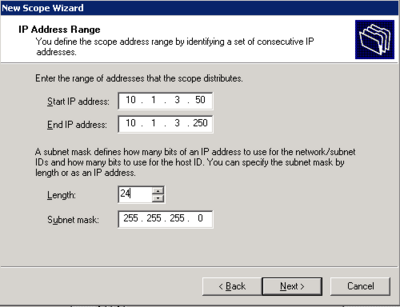
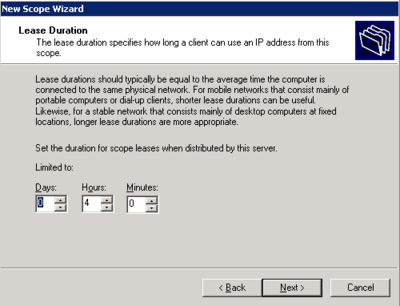
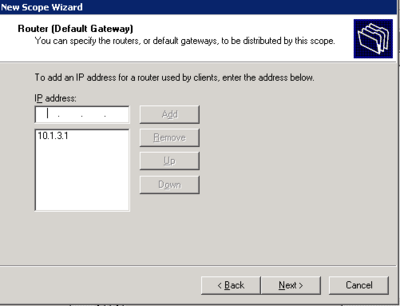
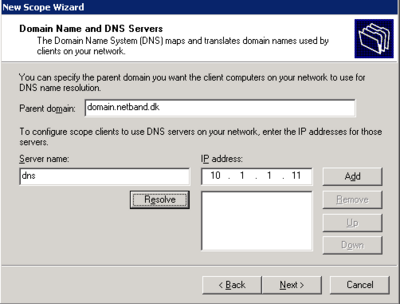
- Install DHCP from add/remove programs > Windows components > Network Services > Dynamic Host Configuration Protocol(DHCP)
- Right click on the server in DHCP management and select new scope.
- Follow the wizard and configure the scope according to specifications
- Click yes when it asks to configure Scope options
- Skip WINS server options
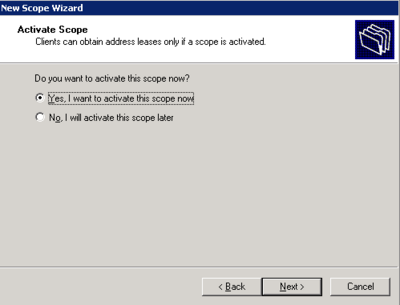
- Activate the scope now or later
The Scope is now active and working for the Phone LAN.
Active Domain
- On the first server run a dcpromo and create a new domain(New tree in a new forrest)
- Create a domain admin account for the domain, this will be used to create users and add computers and new controllers to the domain.
- When the domain is up and running do a dcpromo on the second controller and add it to the domain with the new AD account
Sites and Services
The Sites and services in an AD is used to control userloggons. If you have multiple sites it is important that users always logon to the closest DC. No need to loggon over the WAN.
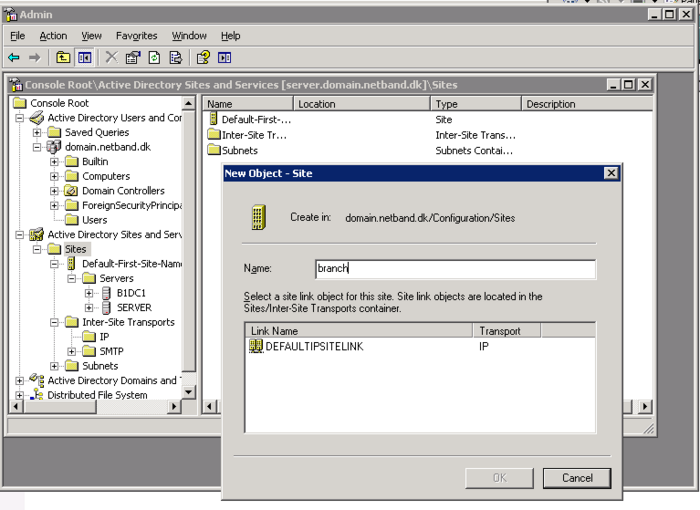
- In the Active Directory Site and Services create the subnets for each site
- Create a site for the HQ and the different Braches.
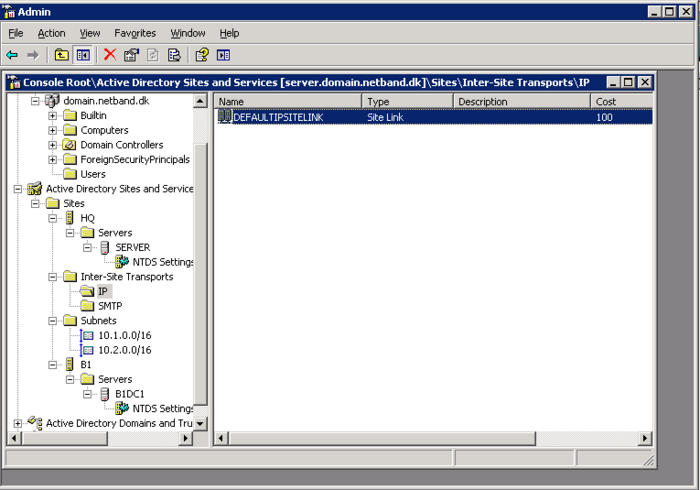
- Drag the newly created domain controller into the new site, and set up bindings between the subnets and the sites.
- Make sure there is a IP site link across the to sites.
It should look something like this.
DFS
Before DFS; one server shared some folders and another server shared other folders. To finde de right share you would need to look on different servers and sometimes the files you needed were on a remote location. DFS solves all the diffuculties in senarios like this. Both on the administrator side and on the user side.
DFS is used to create a namespace where all the shares on different server is mounted into. All the shares will now look like its on the same server from the user perspective.
With DFS Replication it is also possible to merge 2 folders on 2 servers to one, so every file creation, deletion, or change will be replicated to the other servers in the replication group. Users on the different locations will always access the files on the server nearest to them. This means that files will exist in all locations.
In this project we used:
- 2 locations
- 2 servers
- 1 shared folder on each server(only local)
- 1 shared folder on each server(replicated between the locations)
DFS Root
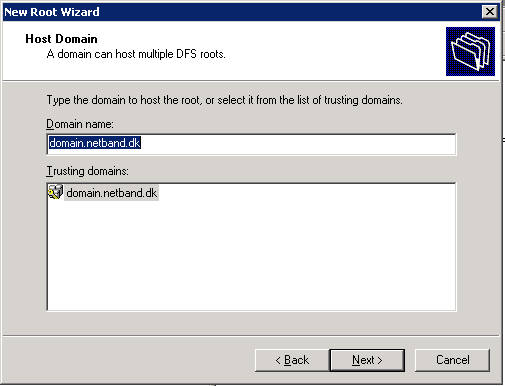
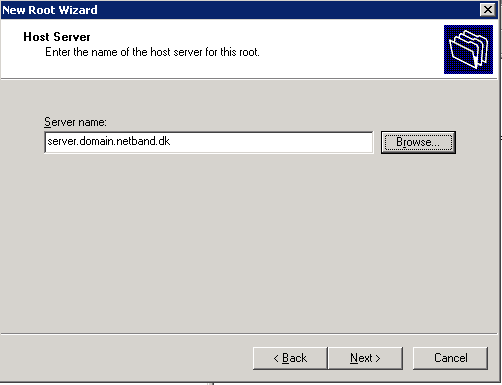
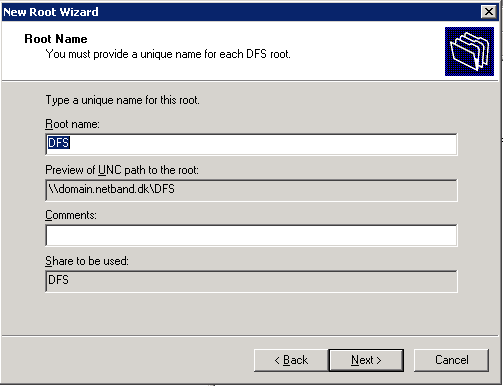
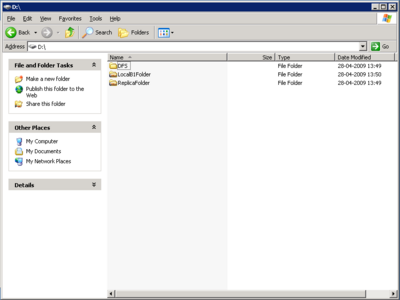
First we need to create a root server for the DFS. With a root folder on the server, this i just a pseudo folder with all the links to the other shares/servers. In this example D:\DFS will be used. And the DFS name will be \\domain.netband.dk\DFS.
DFS Folder Replication
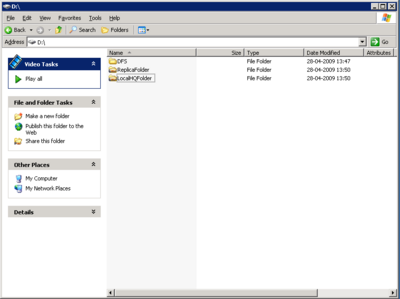
On the first server a new folder called D:\ReplicaFolder has to be created and shared also a folder called D:\LocalHQFolder should be created and shared.
On the second server the same two folders should be created but rename the second folder to LocalB1Folder(B1 for brach 1)
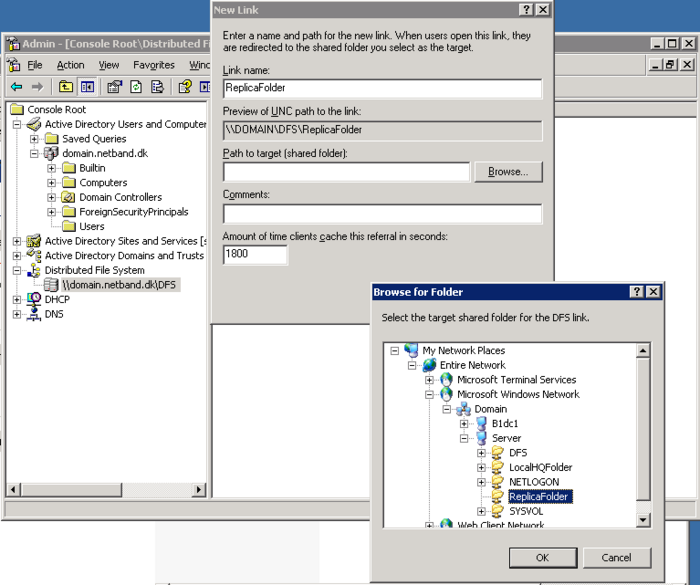
On the new DFS Root reight click and make a new link, name it ReplicaFolder and point it to the shared ReplicaFolder on server 1. Now click on the new link and click new target. Add the ReplicaFolder on the second server and follow the replication wizard.
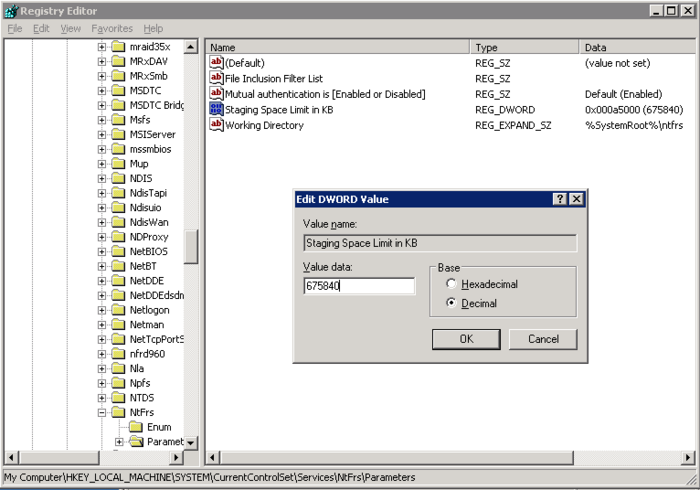
Remember to change the sie of the staging area to allow files greater than 675840KB. The staging area is the replication cache and will be used to hold new files until they are replicated.
Local site shares
Now create a link for each of the shared folders on the servers, the local folder. LocalHQFolder and LocalB1Folder
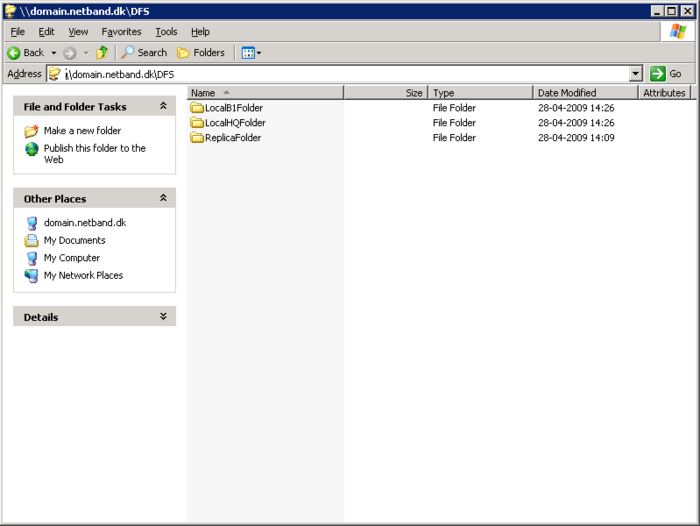
Now in \\domain.netband.dk\DFS there is 3 folder. ReplicaFolder, LocalHQFolder and LocalB1Folder.
- ReplicaFolder is on both the servers and you will allways access the one closests, Both folders will contain the same files also
- LocalHQFolder is located in the Headquarter and only exists on 1 server.
- LocalB1Folder is located in the Brache and only exists on 1 server.
The replication part is greate on remote locations, because all data located in the HQ is up-to-date and you only need to back it up one place.
DFS Links
Introduction to DFS:
http://www.microsoft.com/windowsserver2003/docs/dfs.swf
http://www.microsoft.com/windowsserver2003/technologies/storage/dfs/default.mspx
http://technet.microsoft.com/en-us/library/cc787066.aspx
NTP Client
http://support.microsoft.com/kb/314054
This page is the conf for the Inet Switch in the Netband Project
Building configuration...

Current configuration : 2794 bytes
!
version 12.2
no service pad
service timestamps debug uptime
service timestamps log uptime
no service password-encryption
!
hostname BigUglySW
!
enable secret 5 $1$gkT1$tQ6vTloH5GD1j9vvQPW9L1
!
no aaa new-model
vtp mode transparent
ip subnet-zero
!
!
!
!
no file verify auto
spanning-tree mode pvst
spanning-tree extend system-id
!
vlan internal allocation policy ascending
!
vlan 10
 name Static
!
vlan 20
 name DHCP
!
!
interface FastEthernet0/1
 switchport access vlan 10
 switchport mode access
!
interface FastEthernet0/2
 switchport access vlan 10
 switchport mode access
!
interface FastEthernet0/3
 switchport access vlan 10
 switchport mode access
!
interface FastEthernet0/4
 switchport access vlan 10
 switchport mode access
!
interface FastEthernet0/5
 switchport access vlan 10
 switchport mode access
!
interface FastEthernet0/6
 switchport access vlan 10
 switchport mode access
!
interface FastEthernet0/7
 switchport access vlan 10
 switchport mode access
!
interface FastEthernet0/8
 switchport access vlan 10
 switchport mode access
!
interface FastEthernet0/9
 switchport access vlan 10
 switchport mode access
!
interface FastEthernet0/10
 switchport access vlan 10
 switchport mode access
!
interface FastEthernet0/11
 switchport access vlan 10
 switchport mode access
!
interface FastEthernet0/12
 switchport access vlan 10
 switchport mode access
!
interface FastEthernet0/13
 switchport access vlan 20
 switchport mode access
!
interface FastEthernet0/14
 switchport access vlan 20
 switchport mode access
!
interface FastEthernet0/15
 switchport access vlan 20
 switchport mode access
!
interface FastEthernet0/16
 switchport access vlan 20
 switchport mode access
!
interface FastEthernet0/17
 switchport access vlan 20
 switchport mode access
!
interface FastEthernet0/18
 switchport access vlan 20
 switchport mode access
!
interface FastEthernet0/19
 switchport access vlan 20
 switchport mode access
!
interface FastEthernet0/20
 switchport access vlan 20
 switchport mode access
!
interface FastEthernet0/21
 switchport access vlan 20
 switchport mode access
!
interface FastEthernet0/22
 switchport access vlan 20
 switchport mode access
!
interface FastEthernet0/23
 switchport access vlan 20
 switchport mode access
!
interface FastEthernet0/24
 switchport trunk encapsulation dot1q
 switchport mode trunk
!
interface GigabitEthernet0/1
!
interface GigabitEthernet0/2
!
interface Vlan1
 no ip address
!
interface Vlan10
 ip address 192.168.0.5 255.255.255.0
!
ip classless
ip route 0.0.0.0 0.0.0.0 192.168.0.1
ip http server
!
!
!
control-plane
!
!
line con 0
line vty 0
 exec-timeout 0 0
 no login
line vty 1 4
 no login
line vty 5 15
 no login
!
ntp server 192.168.0.1
!
end
This page is the conf for the Inet Router in the Netband Project
Building configuration...

Current configuration : 1711 bytes
!
! Last configuration change at 08:22:59 UTC Wed Apr 8 2009
! NVRAM config last updated at 13:14:14 UTC Tue Apr 7 2009
!
version 12.4
service timestamps debug datetime msec
service timestamps log datetime msec
no service password-encryption
!
hostname BigUglyRT
!
boot-start-marker
boot-end-marker
!
enable secret 5 $1$sU3m$rNCDdyGOnHu0JqLaRohsl1
!
no aaa new-model
!
resource policy
!
ip cef
!
!
no ip dhcp use vrf connected
!
ip dhcp pool Inet
   import all
   network 192.168.1.0 255.255.255.0
   default-router 192.168.1.1
!
voice-card 0
!
interface FastEthernet0/0
 ip address dhcp hostname BigUgly
 ip nat outside
 ip virtual-reassembly
 duplex auto
 speed auto
!
interface FastEthernet0/1
 no ip address
 duplex auto
 speed auto
!
interface FastEthernet0/1.10
 encapsulation dot1Q 10
 ip address 192.168.0.1 255.255.255.0
 ip nat inside
 ip virtual-reassembly
!
interface FastEthernet0/1.20
 encapsulation dot1Q 20
 ip address 192.168.1.1 255.255.255.0
 ip nat inside
 ip virtual-reassembly
!
interface Serial0/1/0
 no ip address
 shutdown
 clock rate 125000
!
interface Serial0/1/1
 no ip address
 shutdown
 clock rate 125000
!
interface Serial0/2/0
 no ip address
 shutdown
 clock rate 2000000
!
!
!
ip http server
no ip http secure-server
ip nat inside source list 1 interface FastEthernet0/0 overload
ip nat inside source static tcp 192.168.0.11 3389 interface FastEthernet0/0 3389
!
access-list 1 permit 192.168.0.0 0.0.1.255
!
control-plane
!
!
line con 0
line aux 0
line vty 0
 exec-timeout 0 0
 no login
line vty 1 4
 no login
!
scheduler allocate 20000 1000
ntp clock-period 17179805
ntp server 172.16.4.77
end
